
Merryn user guide
How to file work, follow it, and make the decisions your agents bring you.
Download the PDF26 pages · 4.0 MB
Merryn is the shared to-do list your AI agents work from. You file a ticket, agents pull tickets in priority order and do the work, and anything only a person can decide comes back to you as a question on the Desk.
This guide walks through every screen with screenshots, then covers the jobs you will do most: logging an issue, following it to done, and answering the agents' questions. The screenshots show a sample organization, Acme Co, with one project, Storefront, split into two areas: web (the shop) and api (orders and payments). Your own names will differ.
Contents
- 1Signing in
- 2A tour of the screens
- 3Ticket kinds
- 4Logging an issue
- 5What happens after you file
- 6A ticket's page
- 7Features and priorities
- 8The Desk: answering questions
- 9The Dashboard
- 10Docs, Domains, Settings and search
- 11Working from Claude
- 12A daily routine and quick reference
Signing in
Go to merryn.dev/login, enter your organization's name, and sign in with your work account. Your organization may also give you a direct address for each project, which skips the picker. Bookmark the one you use most.
Only people your organization has added can get in. Each person has a role, shown next to your name in the top right of every screen:
| Role | What you can do |
|---|---|
| Read | Look at everything; change nothing. |
| Work | Everything in Read, plus file tickets, comment, and check tickets out to work them yourself. |
| Admin | Everything in Work, plus answer Desk questions and change settings. |
If a button is greyed out with a note such as "Your sign-in can read tickets but not create them", your role does not include that action. Ask an admin.
The project switcher
The square with a project name at the top left (Storefront in the screenshots) is the project switcher. Everything you see, and every ticket you file, belongs to the project selected there. Check it before you file. Admins can start a new project from it with New project…, which opens a short setup wizard.
A tour of the screens
The rail down the left side is the same on every screen. Each screen also has an About this screen link under its title that explains it in one paragraph.
| Rail item | Go here to |
|---|---|
| ⌂ Home | See what needs you today, and take the next ticket with Check out next. |
| ▦ Dashboard | Watch the agents: who holds which ticket, the queue, and anything stuck. |
| ≡ Work | Log and find tickets. Tabs for Tickets, Features and Prioritise. |
| ? Desk | Answer the questions agents could not. The number beside it is how many are open. |
| ¶ Docs | Read and publish pages, decision records and the runbook. |
| ◫ Domains | See each area of the project: its rules, which AI model works which kind of task, and what must always reach a person. |
| ⚙ Settings | Members, agent tokens, the GitHub connection, models and project options. |
Two more items appear only if an admin turns them on under Settings › Project: ⇄ Delivery (pull requests and releases from GitHub) and ≈ Parity (how your product compares with others). The top bar holds search (Ctrl+K, or ⌘K on a Mac), Refresh and a light/dark switch.
Home
Home is the first screen after sign-in. It answers one question: what needs me right now?
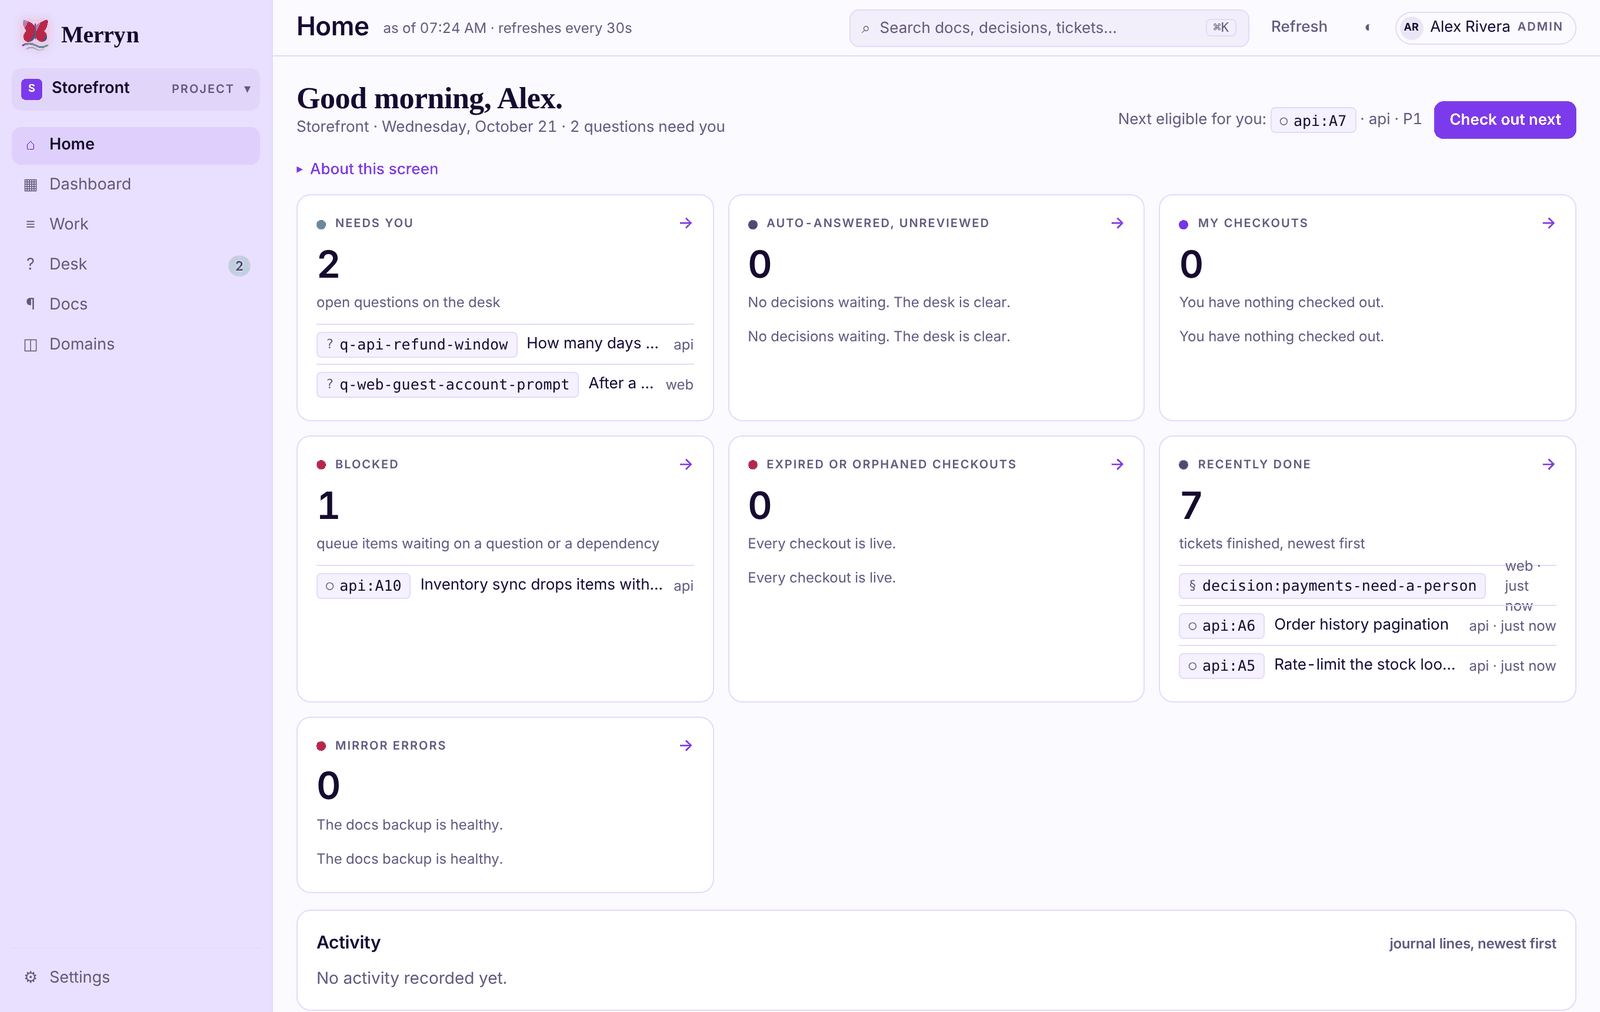
- The greeting line says how many questions need you.
- Next eligible for you names the ticket an agent would take next. Check out next takes it for you to work by hand.
- The cards each show a count and the top three items: Needs you, Auto-answered (unreviewed), My checkouts, Blocked, Expired or orphaned checkouts, Recently done, and Mirror errors. Click a card's arrow for the full list, or a row to open that item.
- Activity, at the bottom, lists what agents recorded, newest first.
Ticket kinds
Everything in Merryn is a ticket, and its kind decides who acts on it. For a bug, a fix or an idea you want done, pick task. Task keys look like web:W12 (the area, then a number); feature keys look like FEAT-0001.
| Kind | Use it for | Who acts on it |
|---|---|---|
| task | A bug, a fix, a small piece of work | An agent pulls it, or you check it out |
| feature | A bigger goal that holds several tasks | An agent breaks it into tasks |
| question | A decision only a person should make | You, on the Desk; it holds the tickets it blocks |
| request | One area asking another for something it needs | Agents file these; as a person, file a task instead |
| note | Context worth keeping that nobody works on | Nobody; agents read it |
| decision | A standing rule agents and the Desk can cite | Recorded once; never worked |
Tier, priority and domain
Three fields decide how a task gets picked up.
- Tier is the kind of work:
impl(build it; the approach is clear),review(check someone's work) ordesign(decide the approach first). Each tier can be routed to a different AI model. Leave it empty and a coordinator sorts it. - Priority runs from P0 (most urgent) to P9. P2 is the default and right for most things.
- Domain is the area of the project the ticket belongs to, such as
weborapi.
Logging an issue
Click ≡ Work on the rail. This is where you log issues and find tickets.
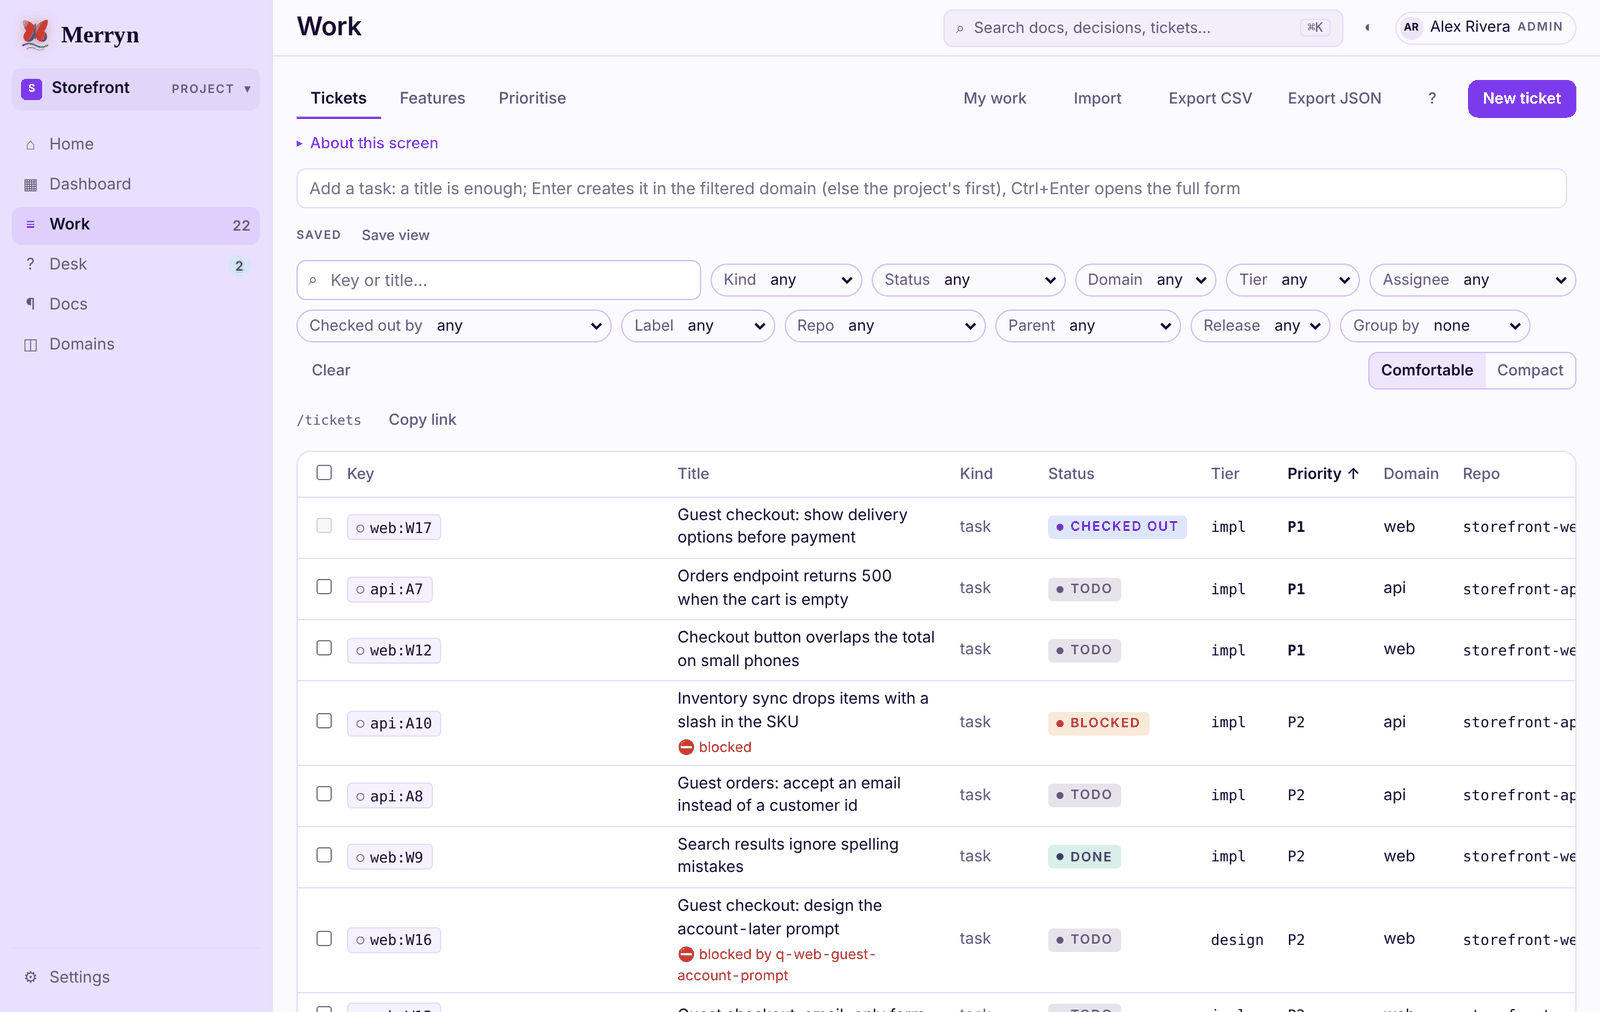
- New ticket (top right) opens the full form. Beside it, My work shows the tickets assigned to you and the comments that mention you, Import brings in tickets exported from Jira, Azure DevOps or Planner, and Export CSV or Export JSON downloads the current view. ? lists the keyboard shortcuts.
- The quick-add box, "Add a task: a title is enough…", is the fastest way to log something.
- Search and the filter chips (Kind, Status, Domain, Tier, Assignee, Checked out by, Label, Repo, Parent, Release) narrow the table, and Group by splits it into sections. Save view keeps a set of filters under Saved; Clear resets them; Copy link copies the filtered view.
- The table is sorted by priority. A red ⛔ line under a title means a question is blocking it. Click any key to open the ticket.
The fast way: quick add
Type a one-line title into the quick-add box and press Enter. A message in the bottom right confirms the new key, and the row appears in the table. The box stays ready, so you can log several issues in a row.
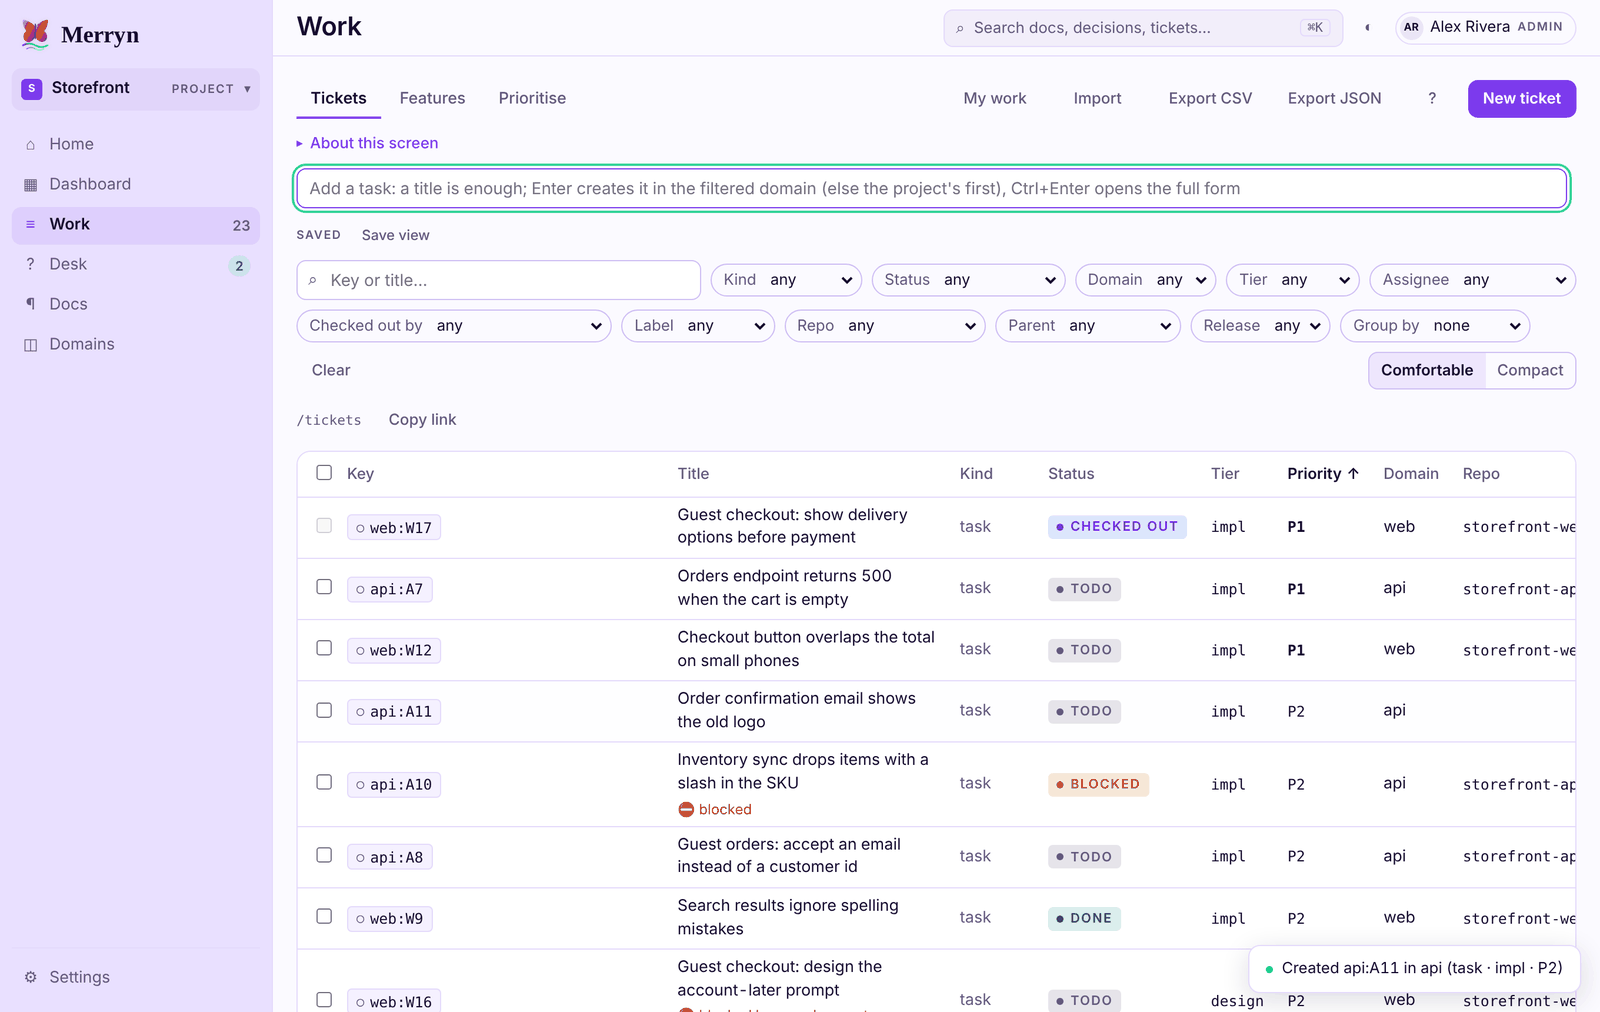
Quick add files a task in the area chosen in the Domain filter, or the project's first area if none is chosen, as tier impl at priority P2. Open the ticket later to add a description or change the priority.
The full form: New ticket
Use the form when you want to explain the issue, set a priority or add a checklist. Click New ticket, or type a title in quick add and press Ctrl+Enter. A panel slides in from the right.
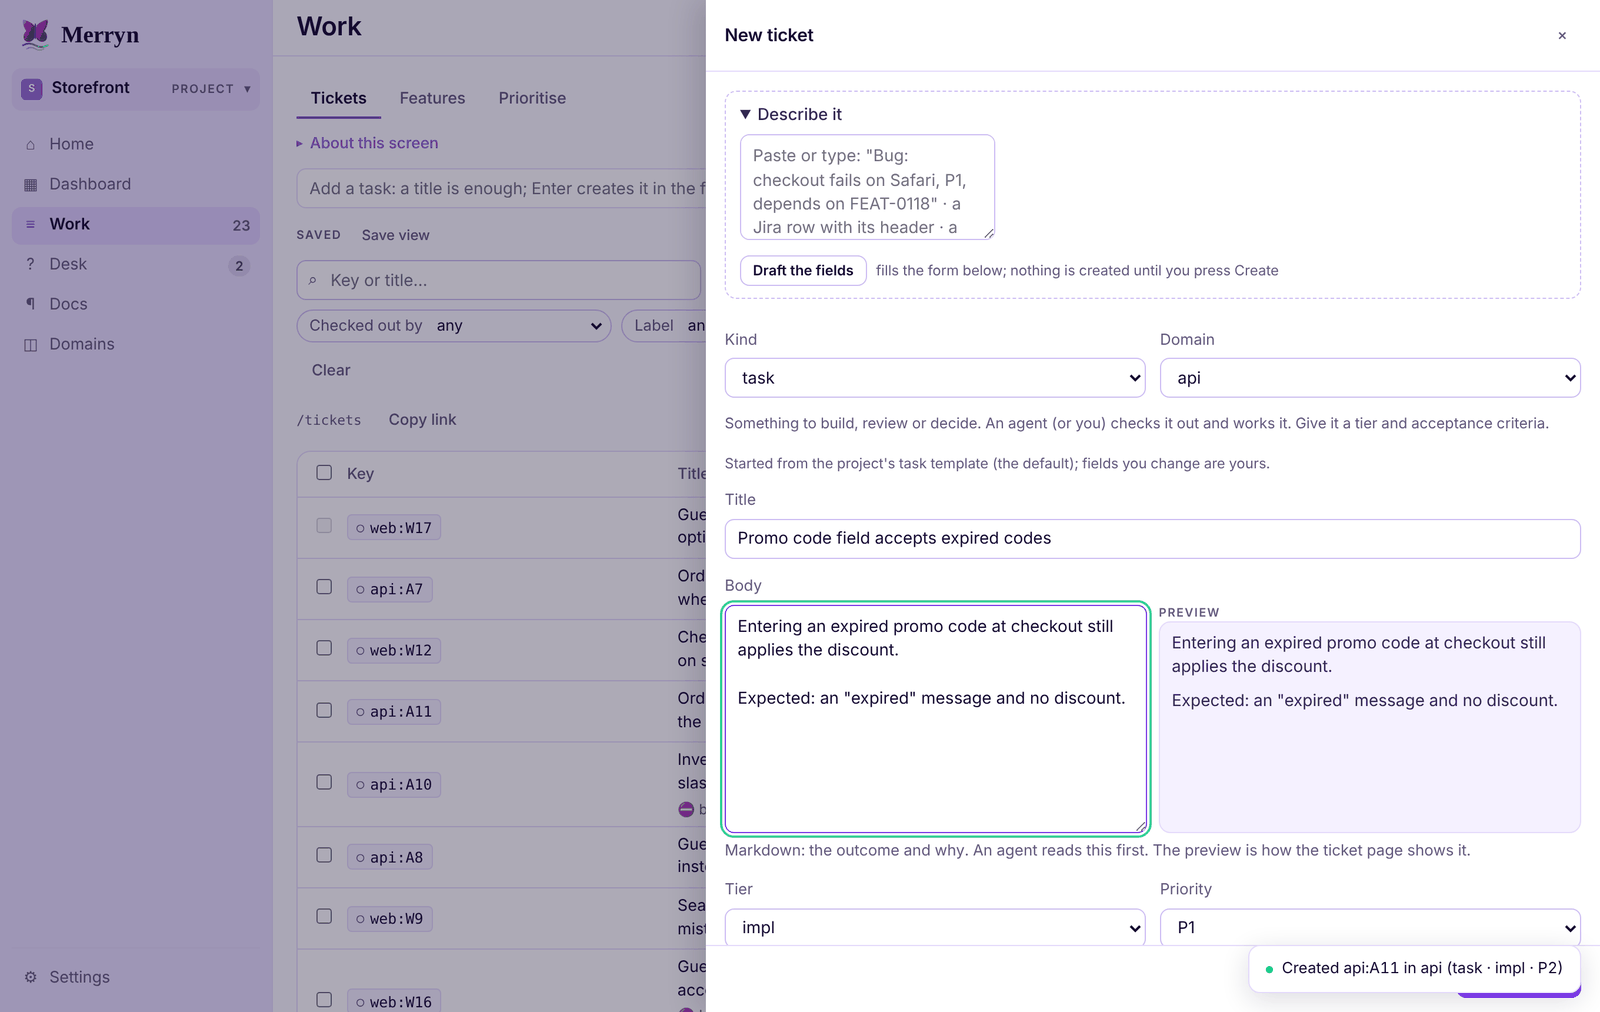
- Describe it (optional): paste a bug report, a chat message or a Jira row, and click Draft the fields. Merryn fills in the form below for you to check. Nothing is created until you click Create ticket.
- Kind: leave it on
taskfor a bug or fix. The grey line under it explains whichever kind you pick, and the form starts from your project's template for that kind. - Domain: the area it belongs to.
- Title: one line that names the problem. It is the only required field.
- Body: what you saw, what you expected, and why it matters. This is the first thing an agent reads. The preview beside it shows how the ticket page will show it.
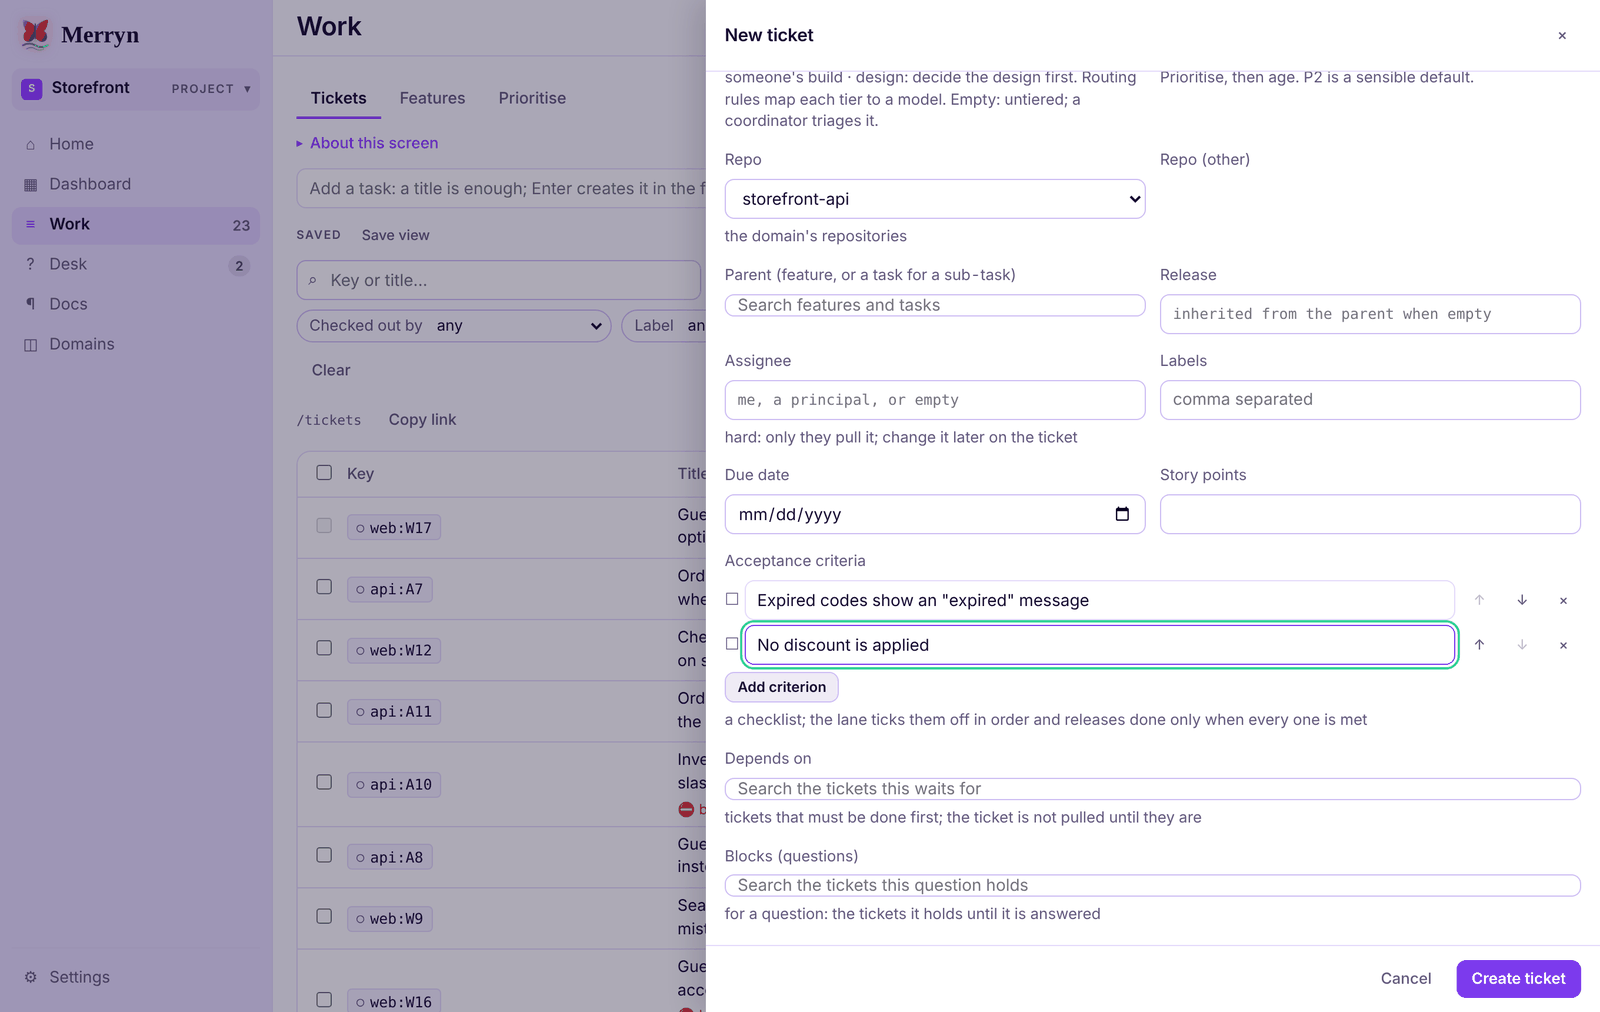
- Tier: pick
implwhen the fix is clear. Left empty, a coordinator sorts it later. Priority: P2 unless it should jump the queue. - Repo, Parent (a feature, or a task for a sub-task) and Release are optional.
- Assignee, Labels, Due date and Story points are optional too. Leave Assignee empty and whoever is free pulls it next.
- Acceptance criteria: click Add criterion and type one outcome per row; Enter starts the next. The agent ticks each off and closes the ticket only when every one is met.
- Depends on: tickets that must be finished first. Click Create ticket; the confirmation names the new key.
Picking the question kind adds Question and Options fields; the request kind adds For and Level. Other kinds do not show them.
What happens after you file
You do not need to assign a ticket to anyone. Agents take the next eligible ticket by priority, then by the order set in Prioritise, then by age. They skip tickets that depend on unfinished work or that an open question is holding. If you do assign a ticket, only that person or agent pulls it, unless you mark the assignment as soft (a preference).
The only step that waits on you is the Desk. When an agent reaches a decision it is not allowed to make, it releases the ticket as blocked and files a question. Your answer sends the ticket back to the queue.
Statuses you will see
| Status | Meaning |
|---|---|
| Todo | Waiting in the queue. |
| Checked out | An agent or a person is working it. Only one holder at a time. |
| Blocked | Waiting on a question, another ticket, or a stated reason. |
| Done | Finished, with every acceptance criterion met. |
| Superseded | Replaced by another ticket. |
A ticket's page
Click any ticket key to open its page. This one is being worked by an agent.
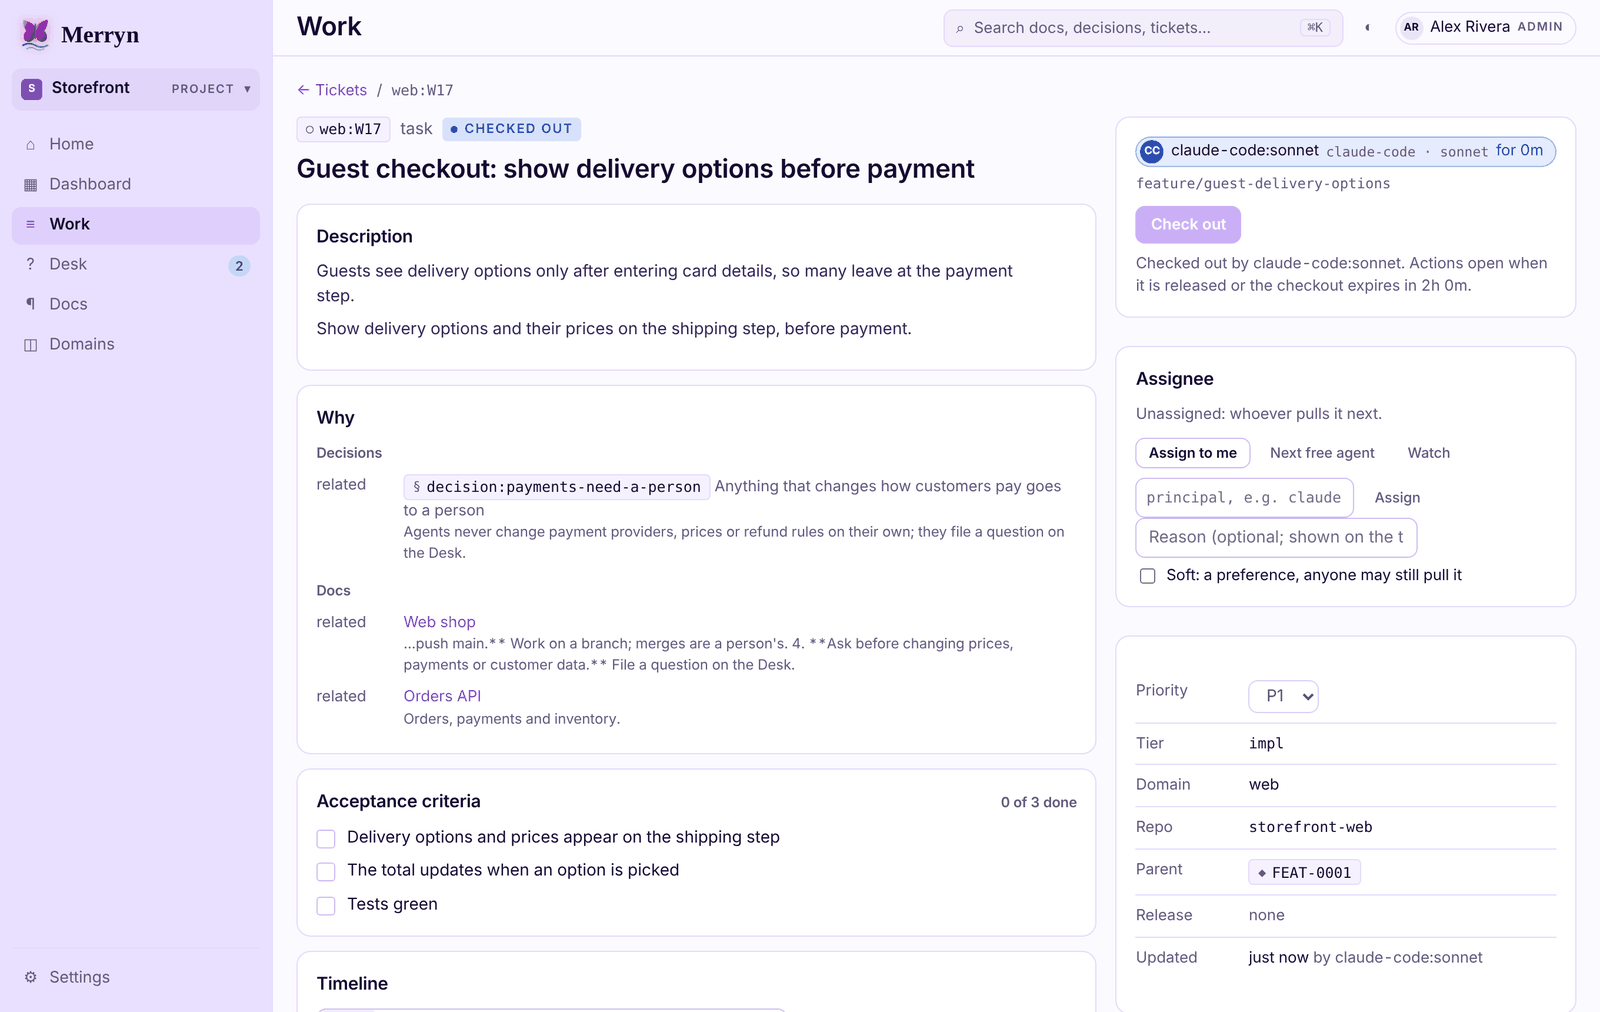
- The header: key, kind, status, then the title.
- Description, then Why: the decisions and docs that bear on this ticket, so you can see the rules the agent is working under.
- Acceptance criteria, with a count such as "0 of 3 done". You can tick items yourself.
- Timeline: everything that happened, with tabs to show only comments, status changes, checkouts or edits. The comment box below it takes Markdown;
@namementions someone and a ticket key links that ticket. Agents read the timeline before they start, so a comment is how you add context or change your mind. - The checkout card (top right): who holds the ticket, on which branch, and when the checkout expires.
- Assignee: Assign to me, Next free agent, or Watch to follow it. Below it, the fields card changes Priority, Parent or Release, and Links lists commits, docs and pull requests.
Working a ticket yourself
You can take a ticket the same way an agent does. That stops two people, or a person and an agent, doing the same work.
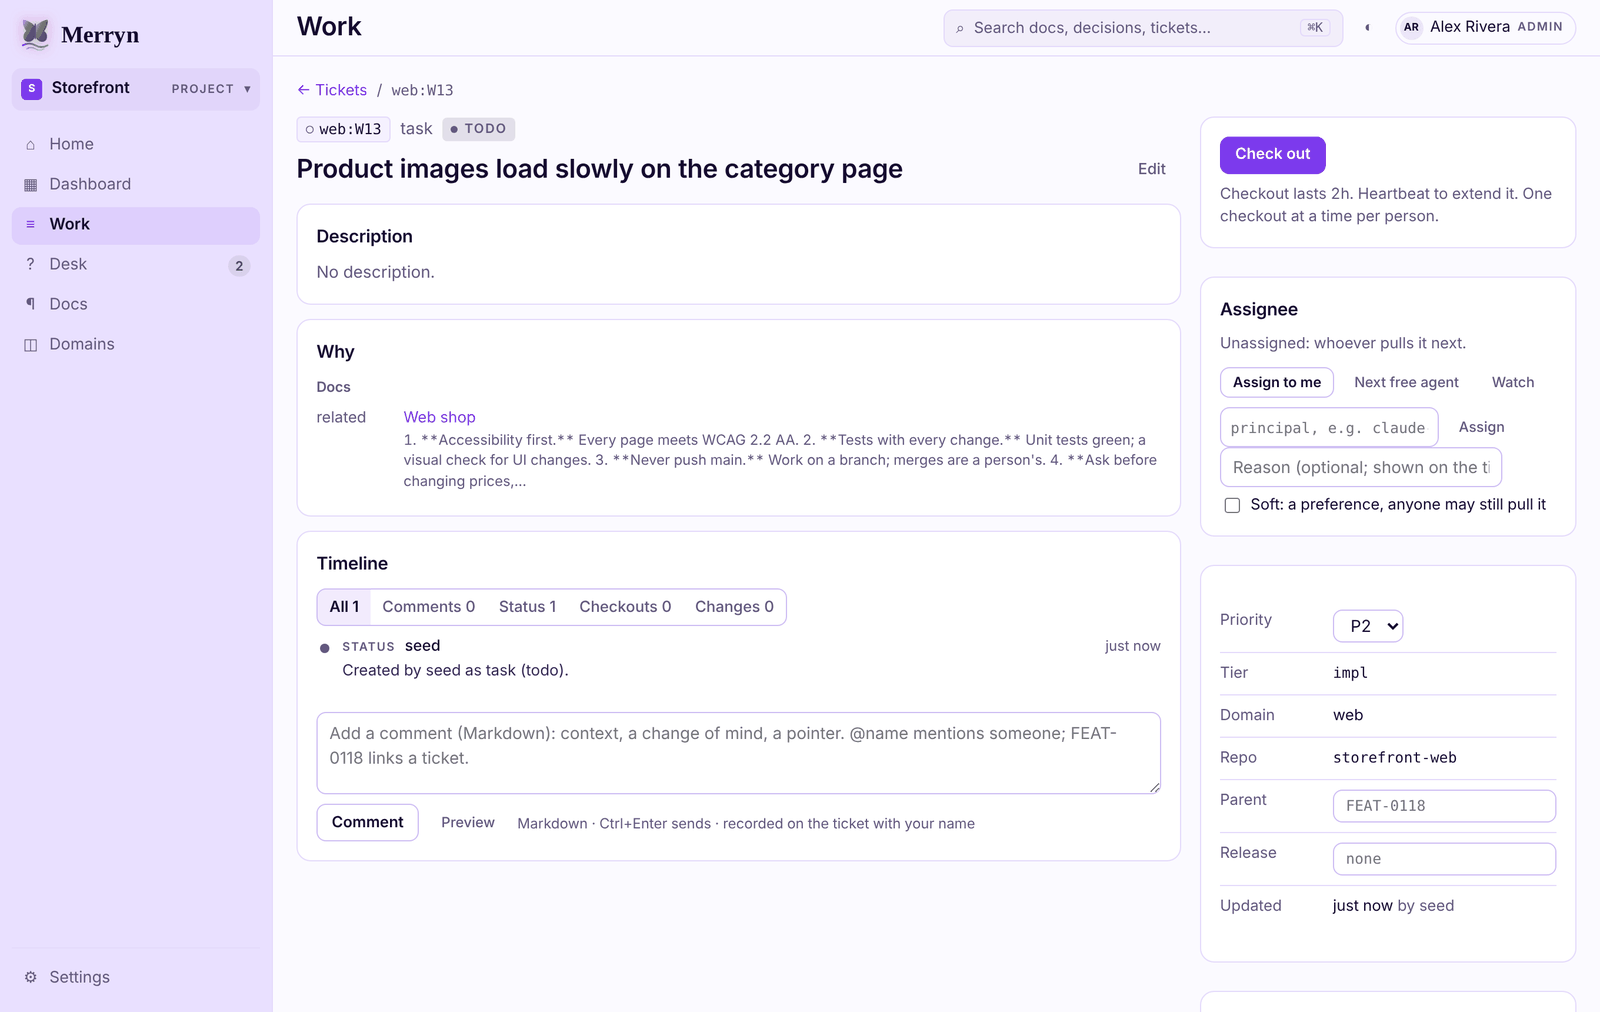
- Click Check out on the ticket (or Check out next on Home).
- Click Heartbeat if you need more time; it extends the checkout by another 2 hours.
- When you finish, click Release… and pick an outcome.
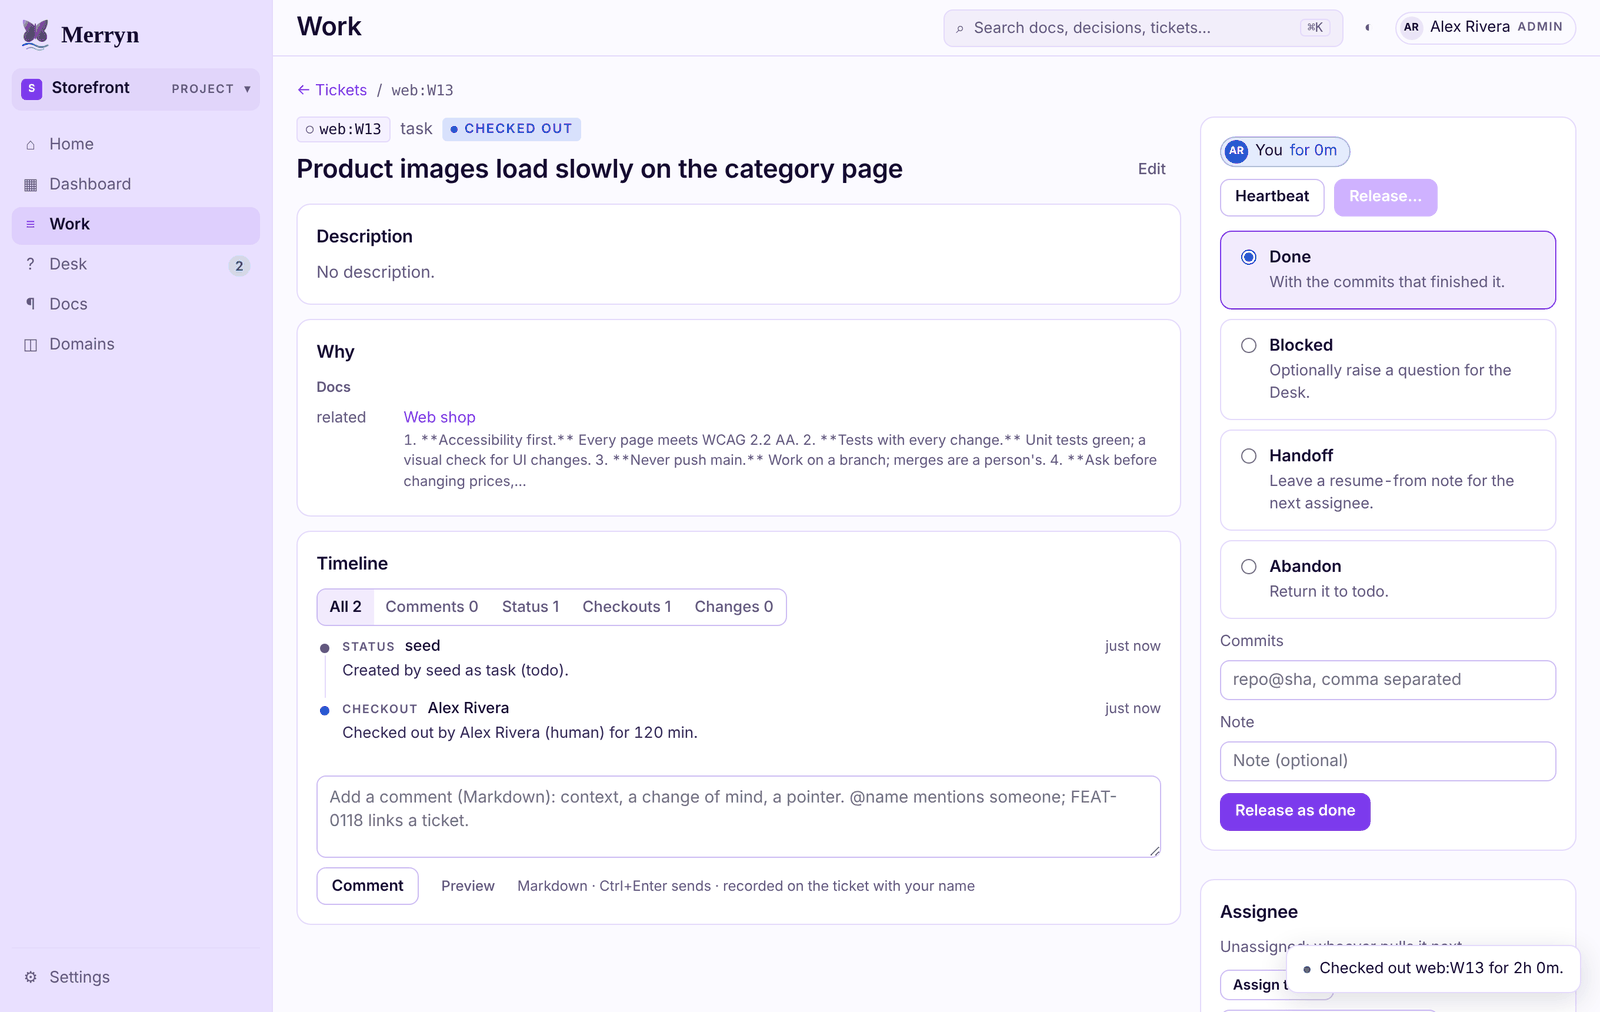
| Outcome | Use it when |
|---|---|
| Done | The work is finished. Optionally list the commits as repo@sha. |
| Blocked | You cannot continue. Give a reason, and optionally a question for the Desk. |
| Handoff | Someone else should finish it. Leave a note on where to pick up. |
| Abandon | Put it straight back in the queue. |
Features and priorities
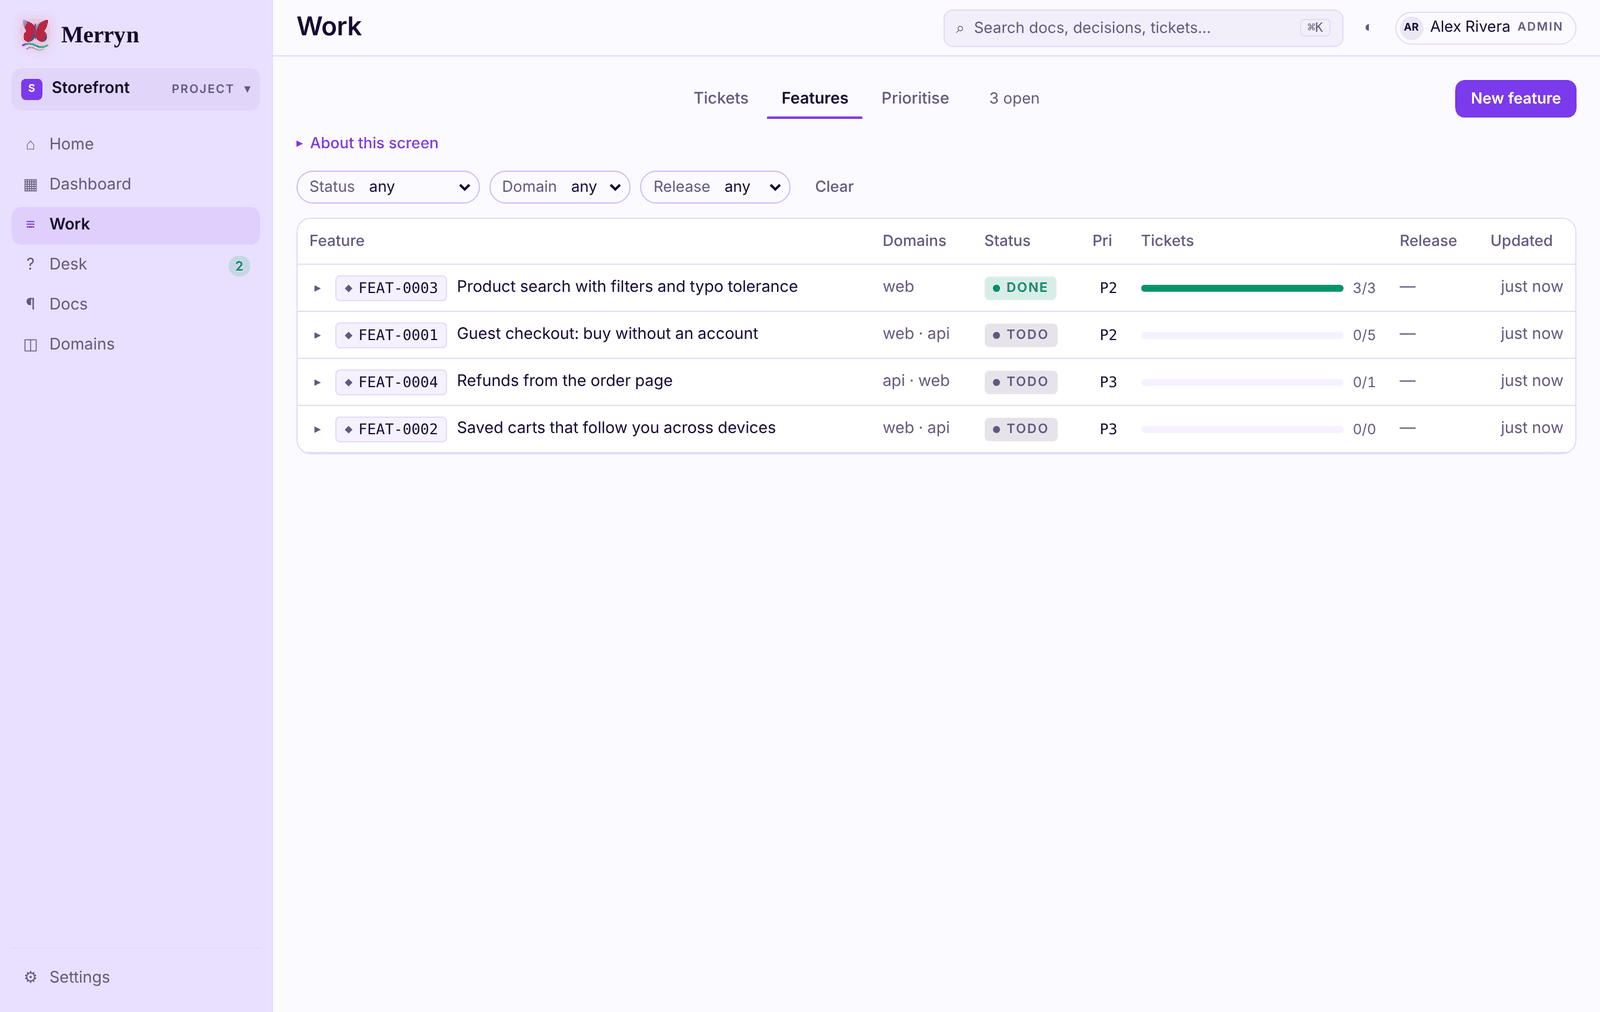
The Features tab on Work lists the bigger goals. Click the ▸ arrow on a row to see its tickets and add one with New ticket in this feature. New feature (top right) files a new feature: describe the outcome you want and an agent breaks it into tasks.
Prioritise
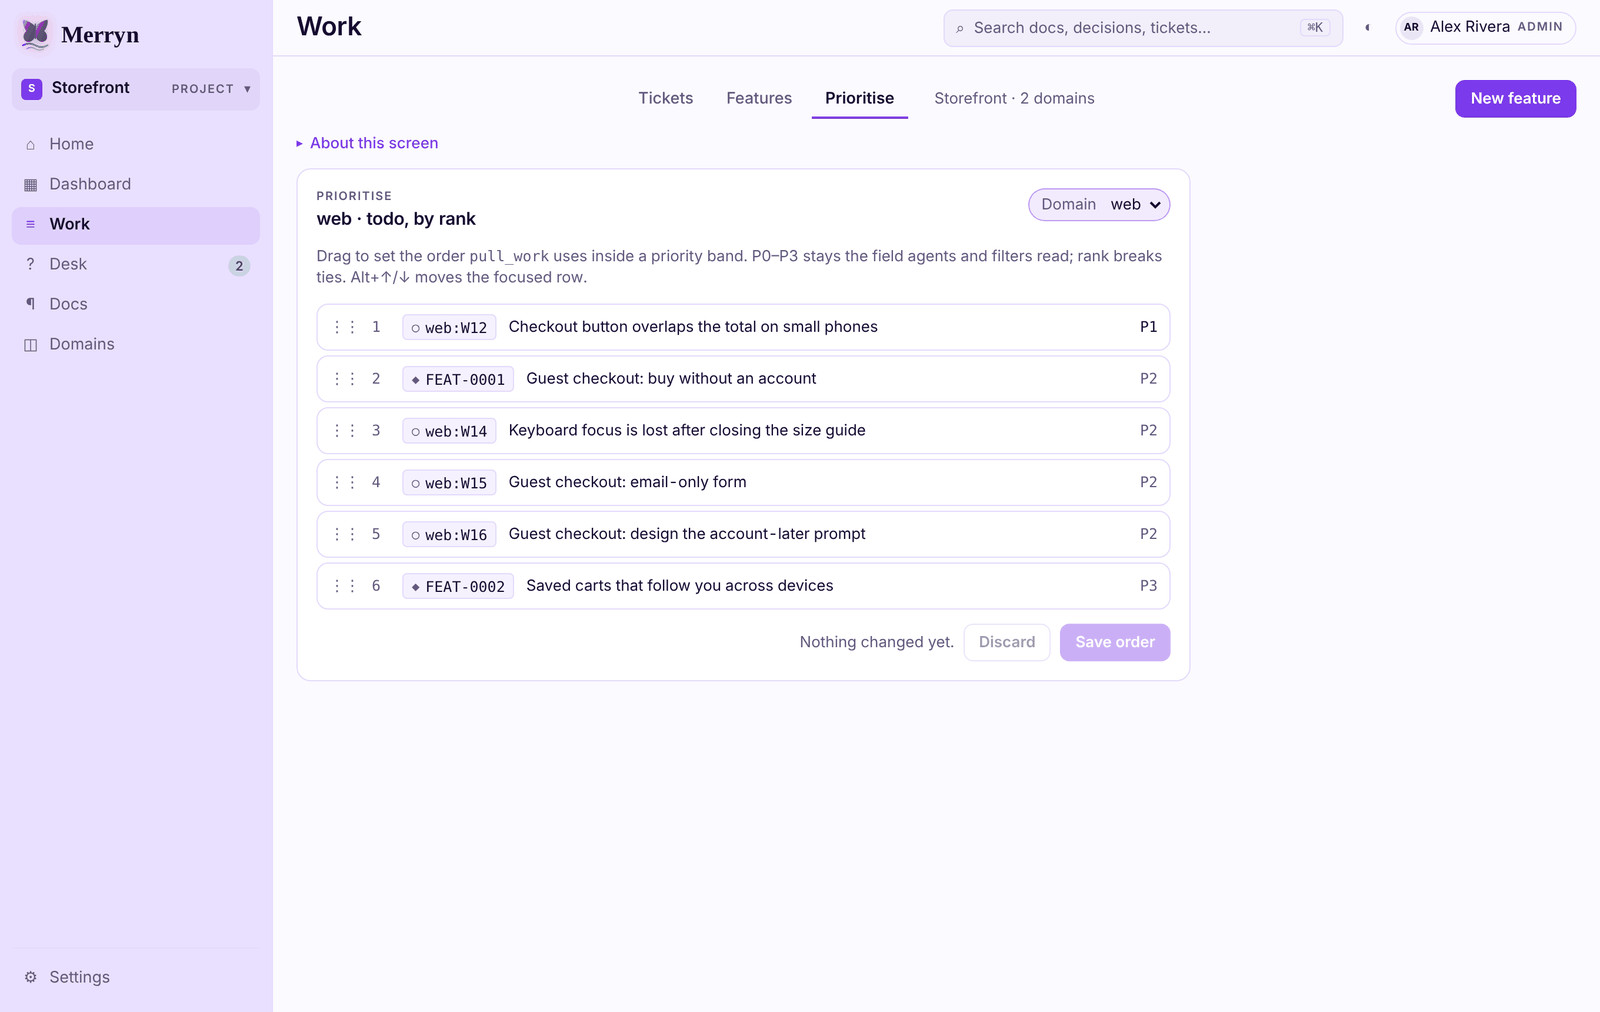
Priority sets the band (P0, P1, P2…). The Prioritise tab sets the exact order inside a band, which is the order agents pull.
- Pick the area with the Domain chip at the top.
- Drag a row by its ⋮⋮ handle, or focus it and press Alt+↑ or Alt+↓.
- Click Save order. Discard throws away moves you have not saved.
The Desk: answering questions
The Desk is where agents bring decisions they are not allowed to make. Answering one is the most useful thing you can do in Merryn, because every ticket the question holds goes back into the queue the moment you decide.
Decide a question
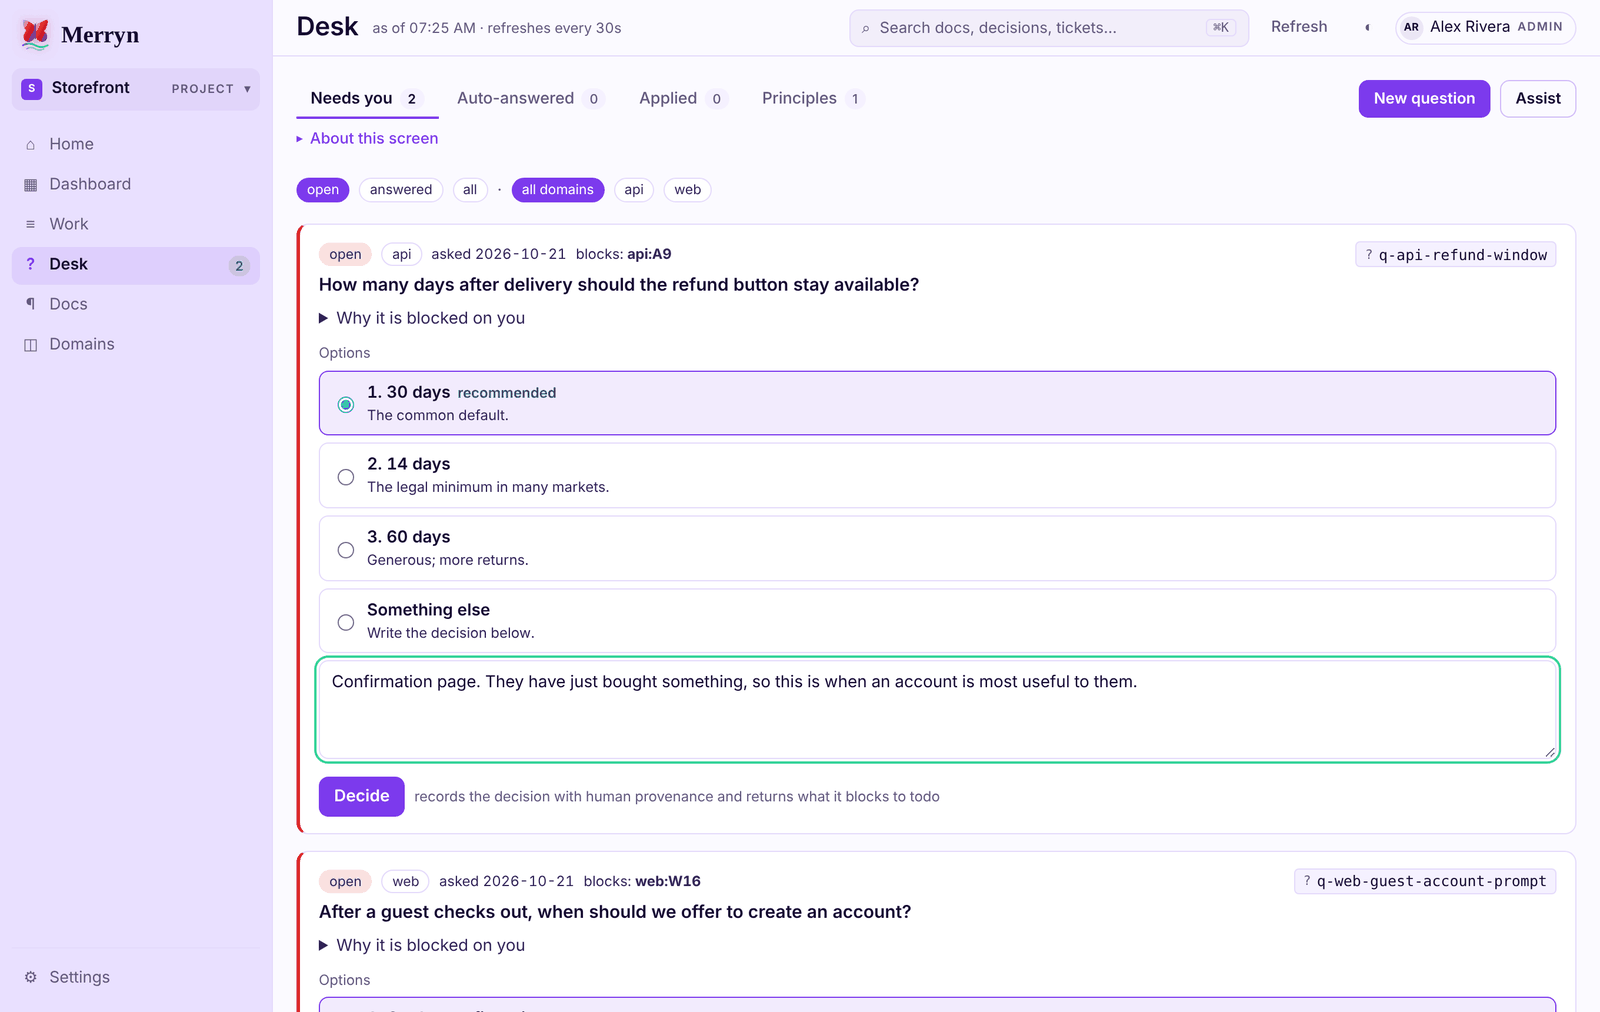
- Click ? Desk. The questions holding the most work come first.
- Read the card: what it blocks, the question, and the folds Why it is blocked on you and Filed recommendation.
- Pick an option. The recommended one is pre-selected and labelled. Choose Something else to write your own answer.
- Write your reasoning in the box. It is recorded word for word, and agents read it, so one sentence of why is worth more than the option label. Your draft survives a refresh.
- Click Decide.
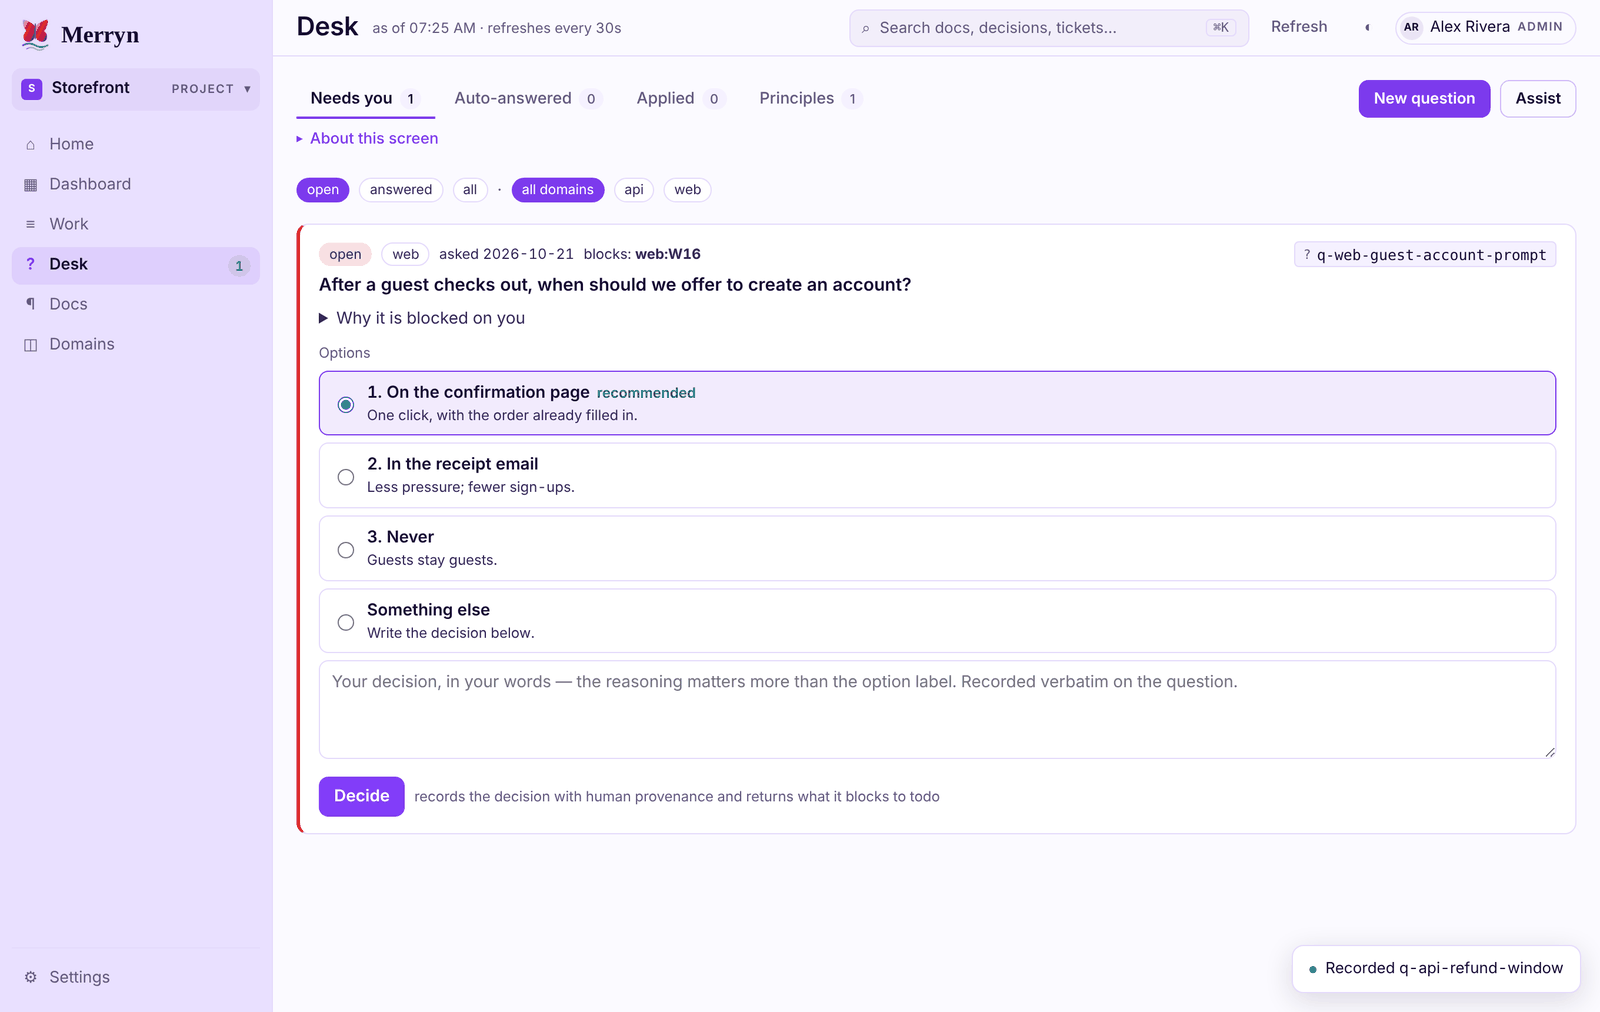
An answered question can be re-opened later from the answered filter. The old answer stays in its history and the tickets it held wait again.
The other tabs and buttons
| Tab or button | What it does |
|---|---|
| Auto-answered | Answers the Desk made for you by citing one of your principles. Review each with Accept, Adjust or Veto. |
| Applied | The record of every answer. |
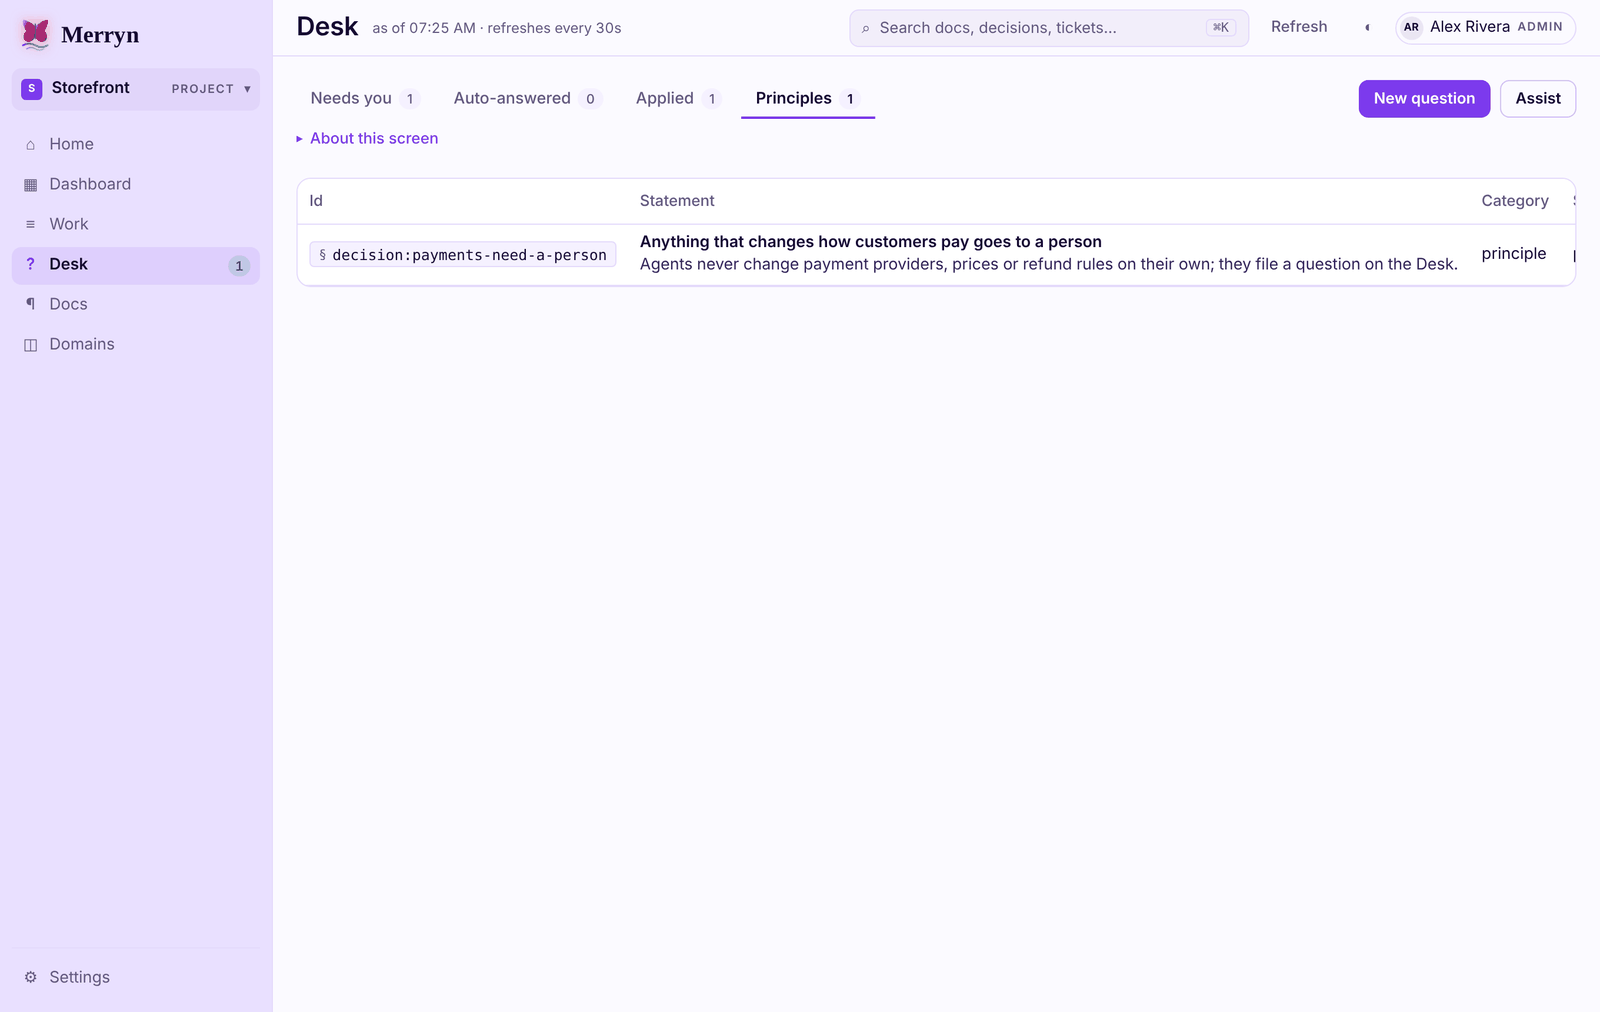
| Principles | Your standing rules, which the Desk can cite. Edit changes one. |
| New question | Files a question for yourself, to park a decision you are not ready to make. |
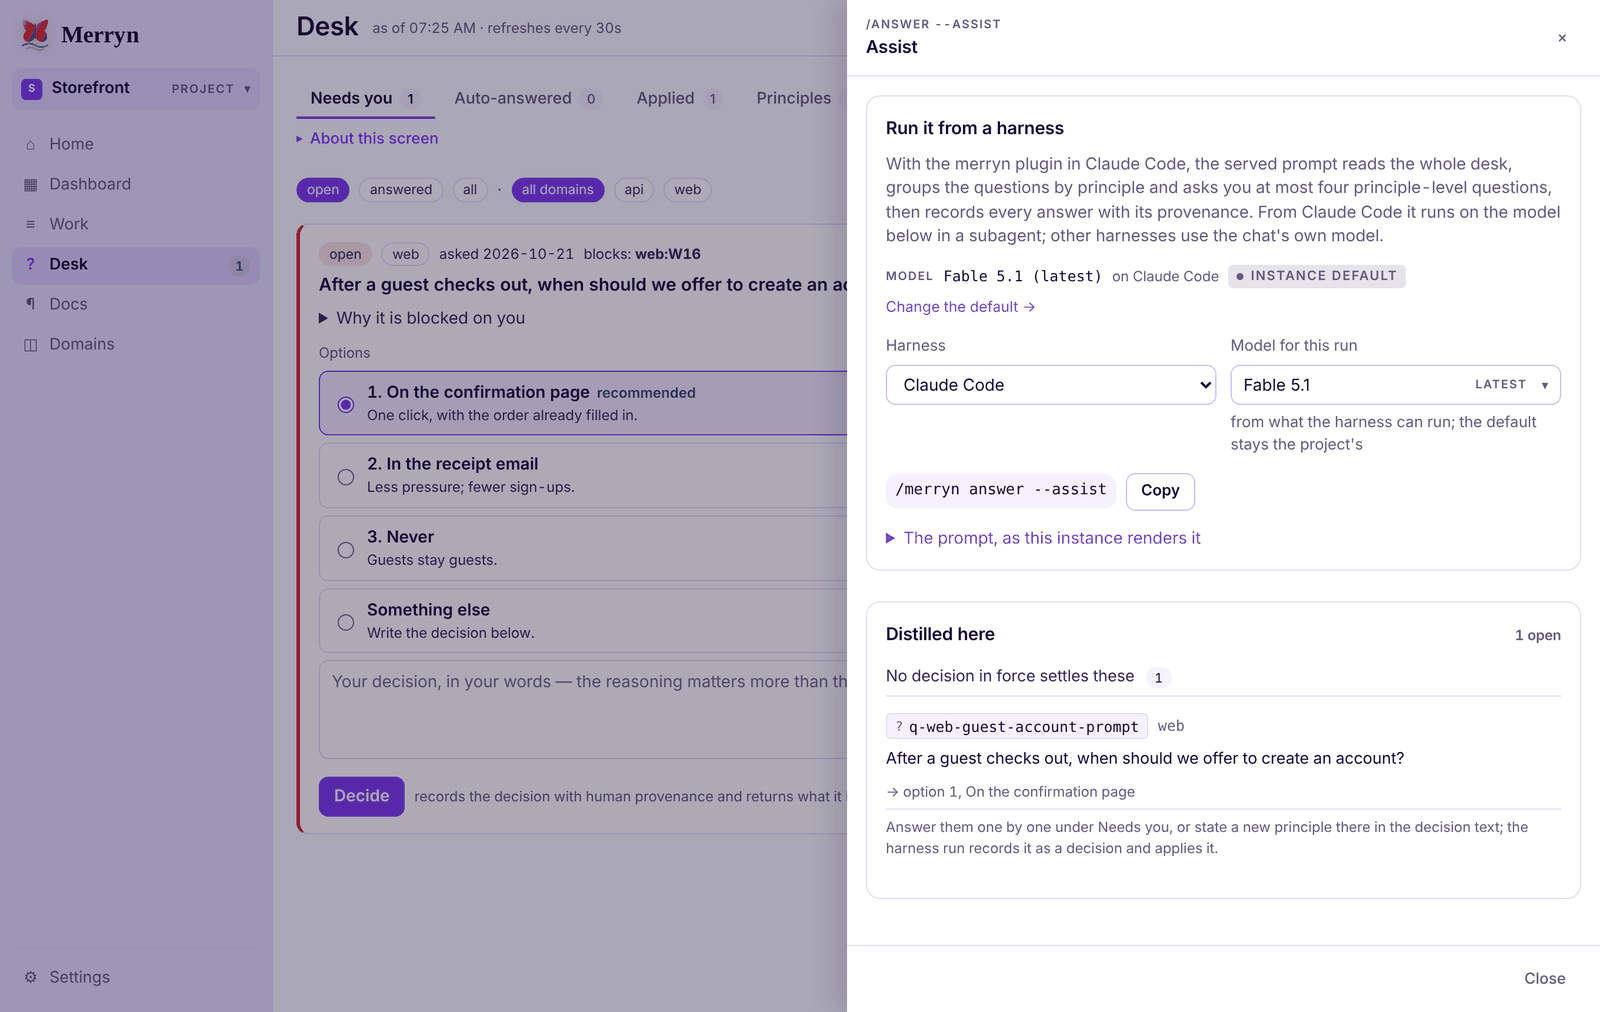
| Assist | Groups open questions by the principle that would settle them. |
Assist
Assist opens a side panel. Distilled here lists each principle with the questions it would settle; Answer N by this principle decides them all at once, and they then appear under Auto-answered for you to review. Run it from a harness gives a command to do the same from a Claude Code session (see chapter 11).
The Dashboard
The Dashboard shows what the agents are doing right now. Use it to check progress or to unstick something.
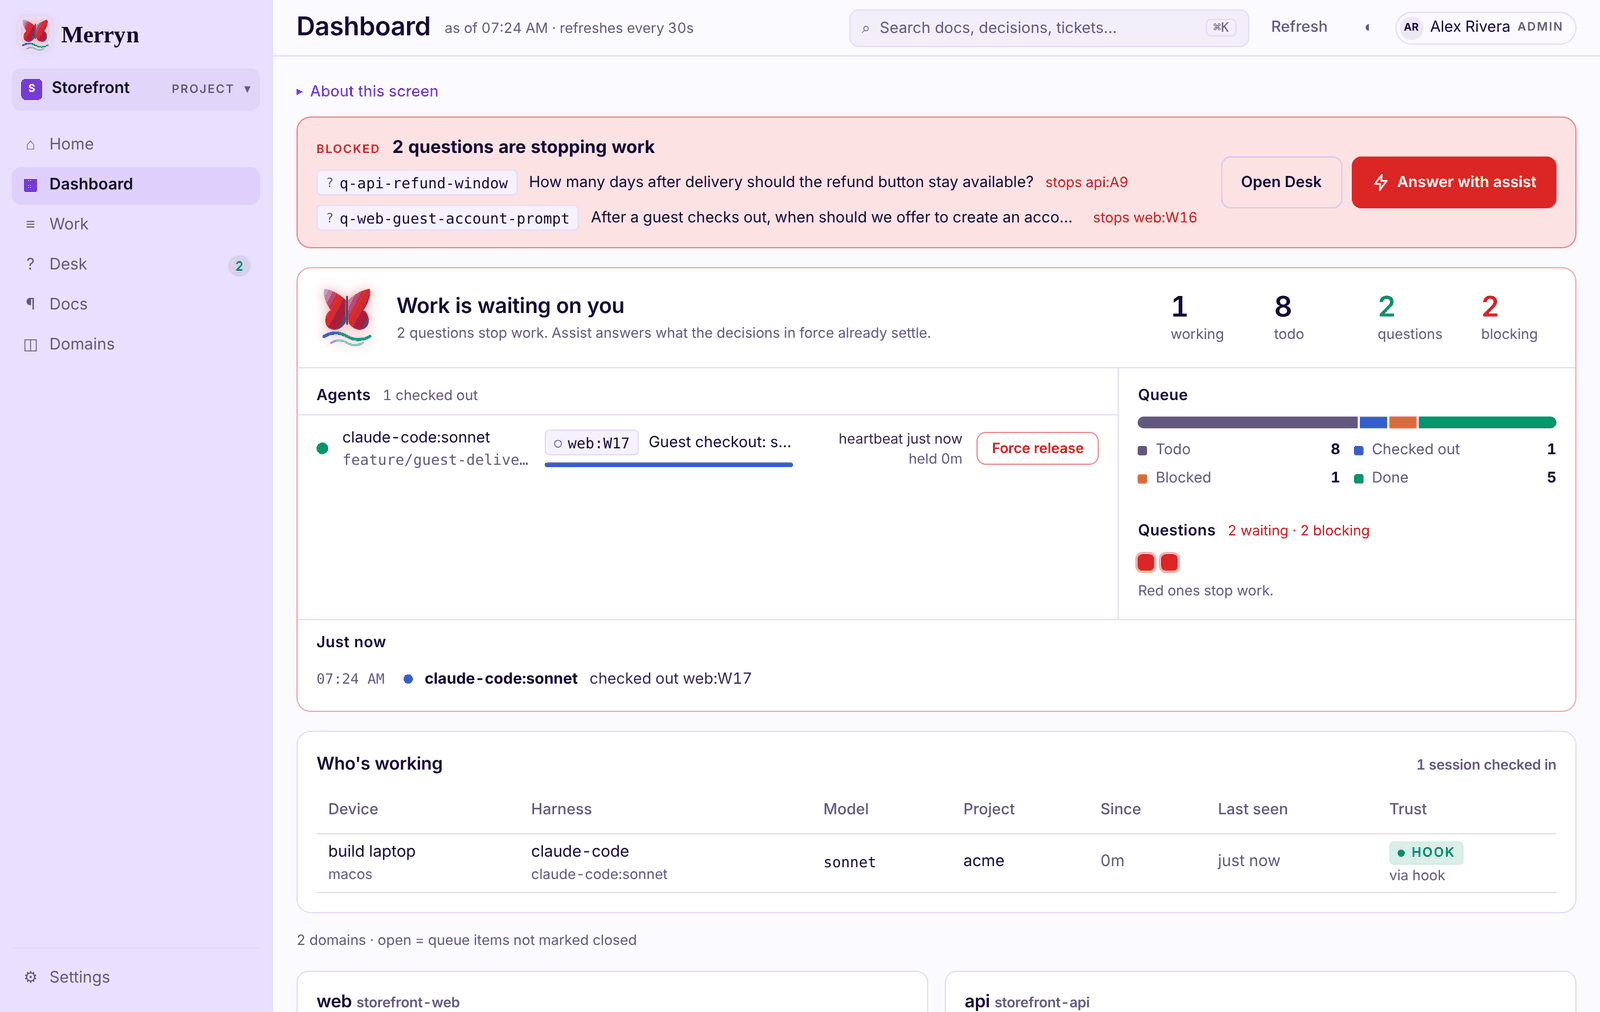
- The red banner appears only when open questions are stopping work. Open Desk takes you to them; Answer with assist opens Assist.
- The status card counts what is working, waiting, and blocked. The butterfly flaps at each change and turns red while a question blocks work.
- Agents shows one lane per checkout: who holds which ticket, on which branch, and the last heartbeat. Force release returns a stuck checkout to the queue.
- Queue shows todo, checked out, blocked and done; Just now lists the latest moves.
- Who's working lists every AI session that has checked in, with its device, model and when it was last seen.
- Further down, each area has a card with its position (the agent's own summary of where things stand) and its queue by tier.
Docs, Domains, Settings and search
You will need these less often than Work and the Desk.
Docs
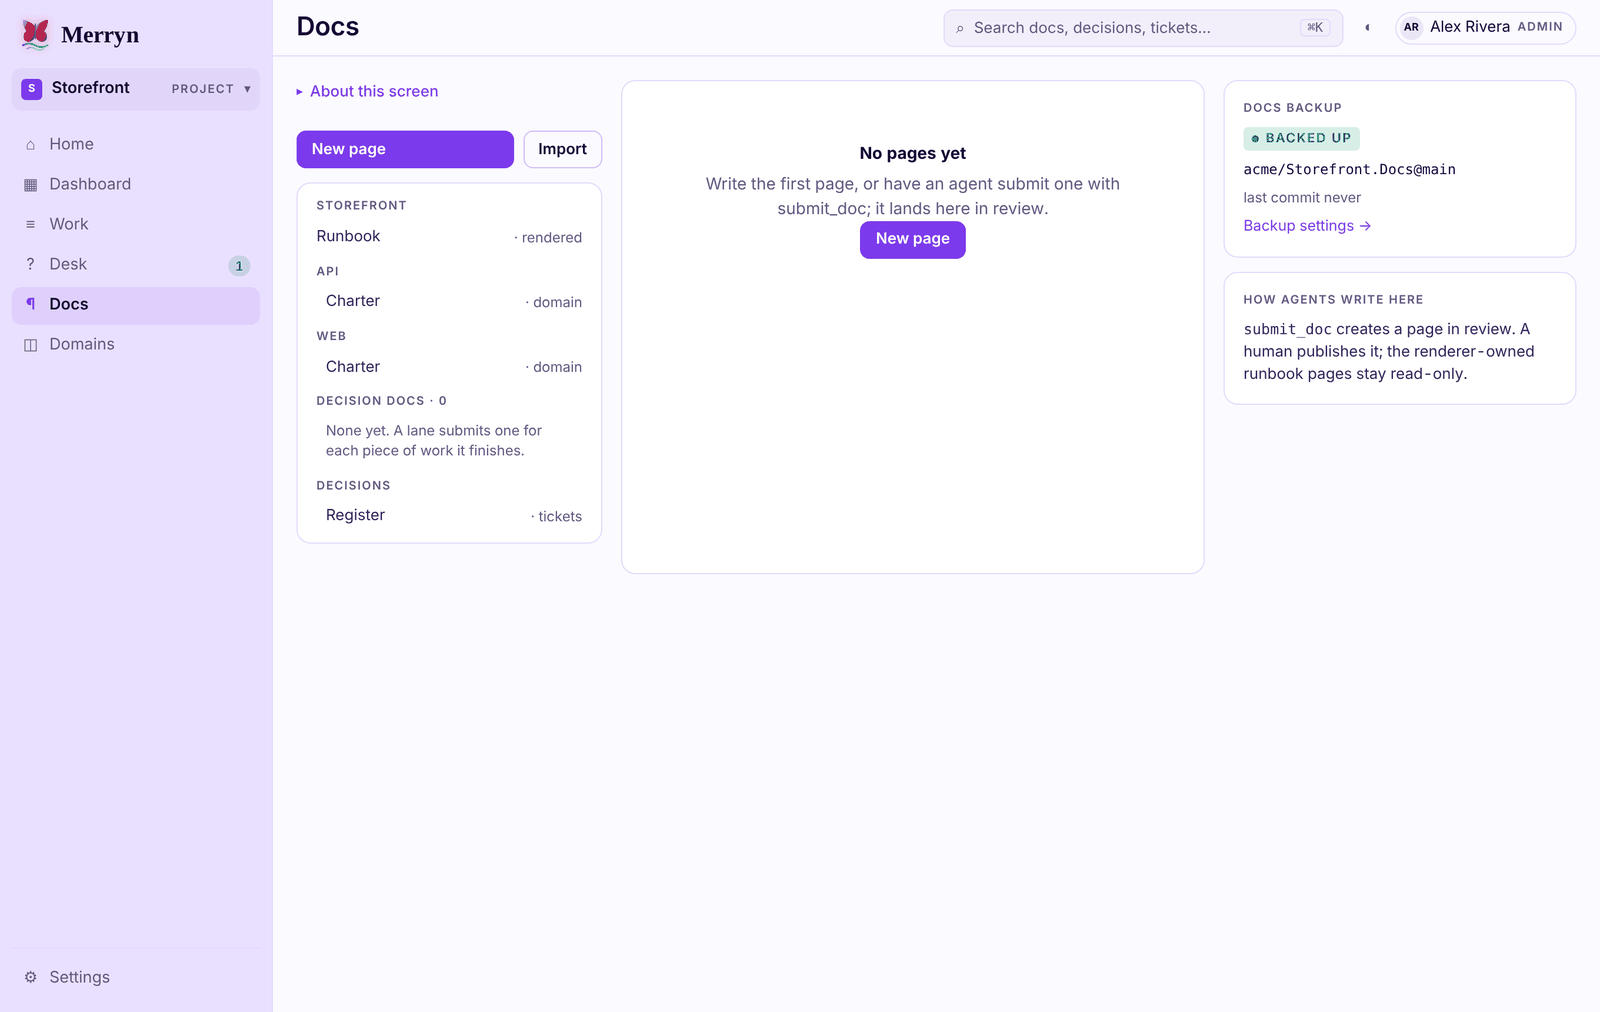
¶ Docs holds pages agents submit for review (a person publishes them), the decision records each piece of work leaves behind, the register of decisions, and the runbook. New page writes one yourself. Published pages are backed up to a Git repository, shown on the right.
Domains
A domain is one area of the project. A simple project needs only one.
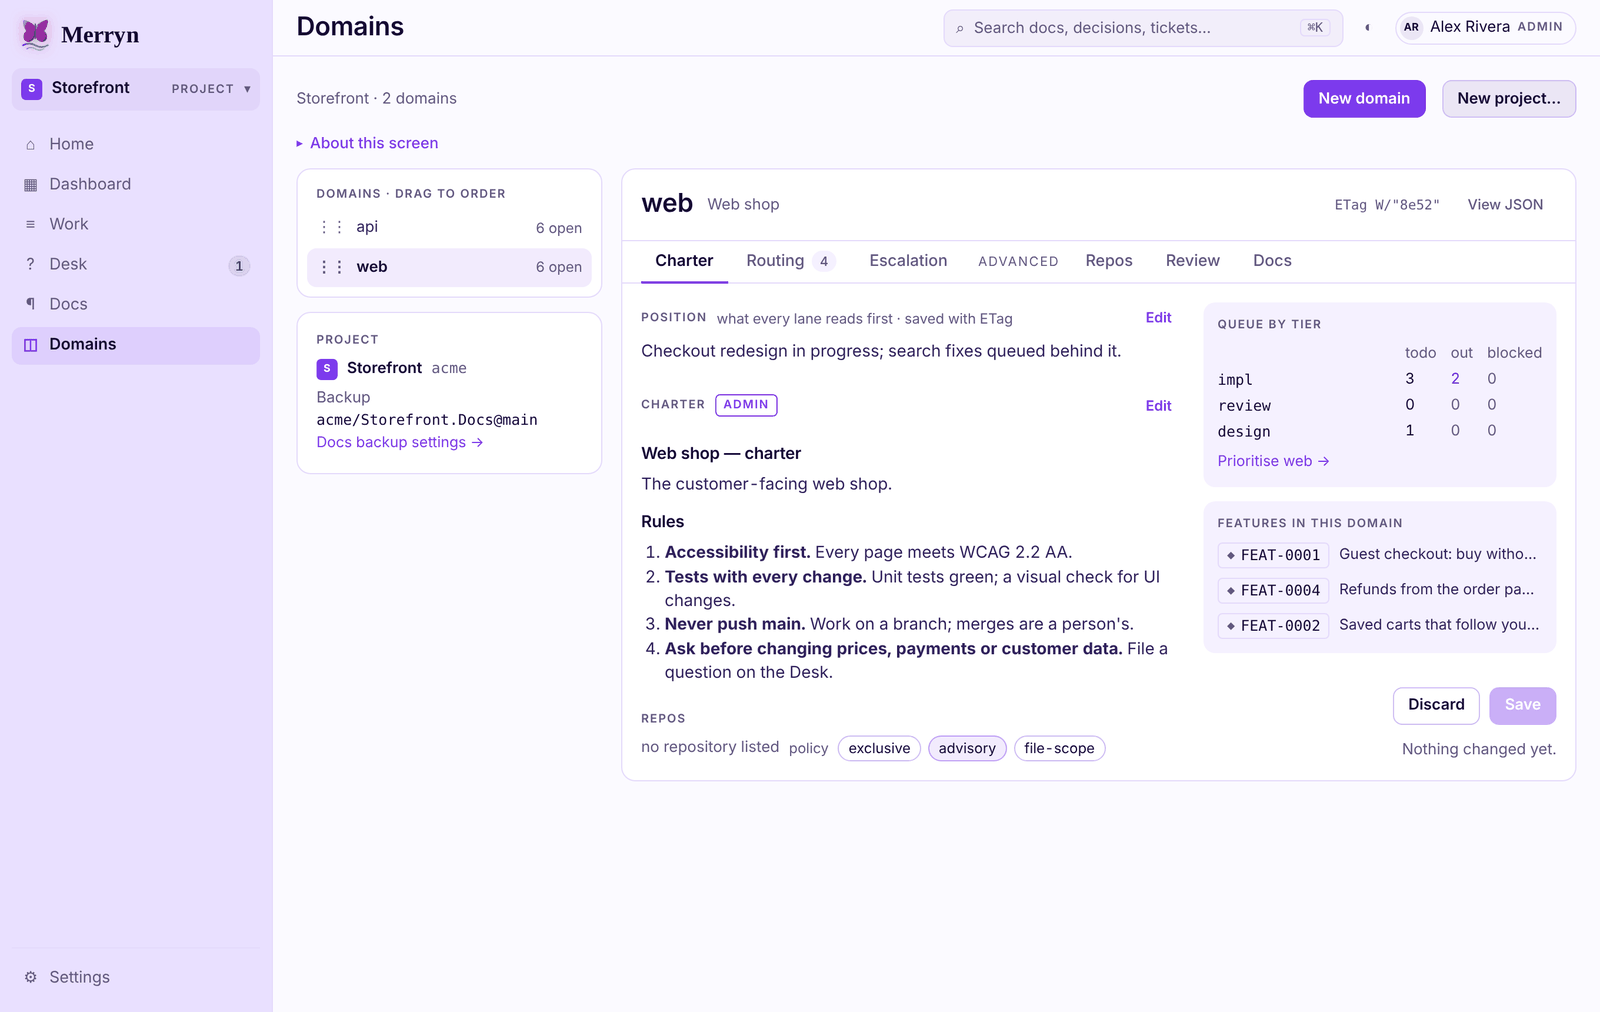
- Charter: the fixed rules every agent reads before working in this area.
- Position: where the work stands; agents update it after each round, and Edit lets you change it.
- Routing: which AI model works which tier. Escalation: which kinds of question must always reach a person.
- Repos, Review and Docs: where the code lives, how work is checked, and what records each piece of work leaves.
- Names: inside a project a domain can carry a name, and the board shows it and the keys under it by that name (
mobile:M12for the storedbeta-mobile:M12). A key shown by name means that item only inside its project: elsewhere, and anywhere you copy it out of the project, use the stored key (hover a key shown by name to see it). Question keys (q-…) always show as stored. A key from another project whose domain shares a name used here shows as stored with↗after it: follow the link rather than typing it, since typed here it would mean this project's item. - New domain and New project… are at the top right.
Settings
⚙ Settings, at the bottom of the rail, has two groups. Organization: Organization, Members, Agents & connect, Integrations (GitHub), Notifications and Models. Project: the project's title, colour and Desk model, its docs backup, ticket Templates, Skills & Features, Connect (adding Merryn to ChatGPT or Claude), Runners, and Import / Export.
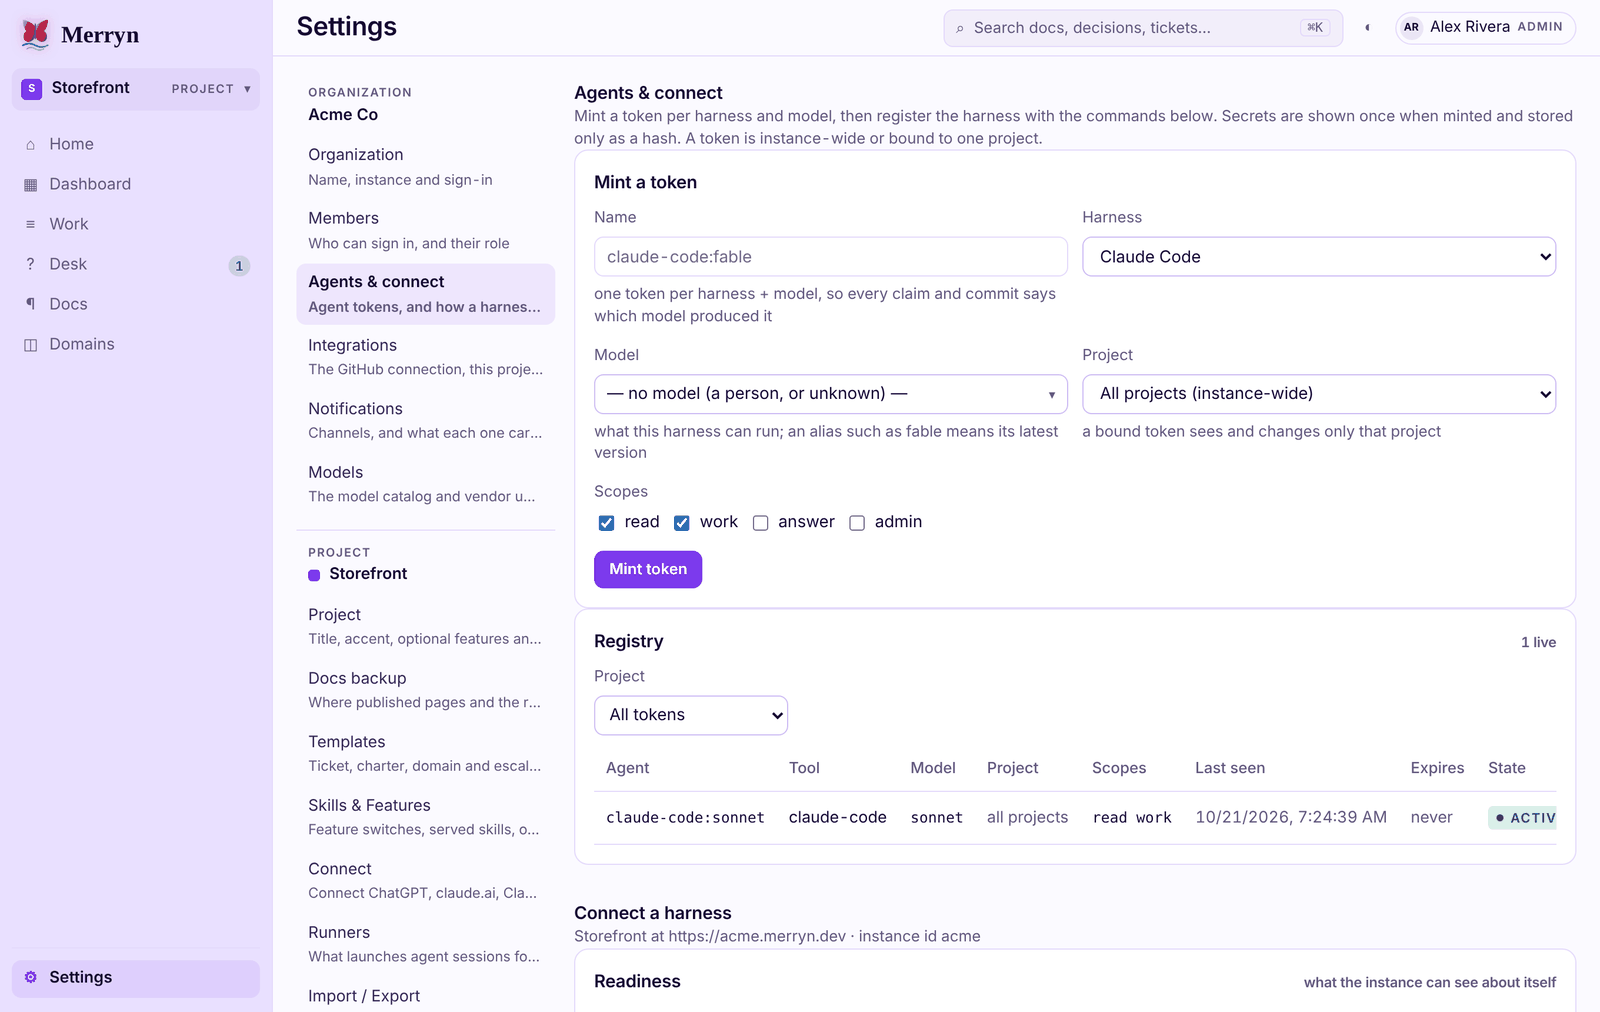
To let an AI tool such as Claude Code work your queue, an admin mints a token here: give it a name, pick the tool and model, choose the project and scopes, and click Mint token. The secret is shown once. The Connect a harness section below gives the exact setup commands for each tool.
Search
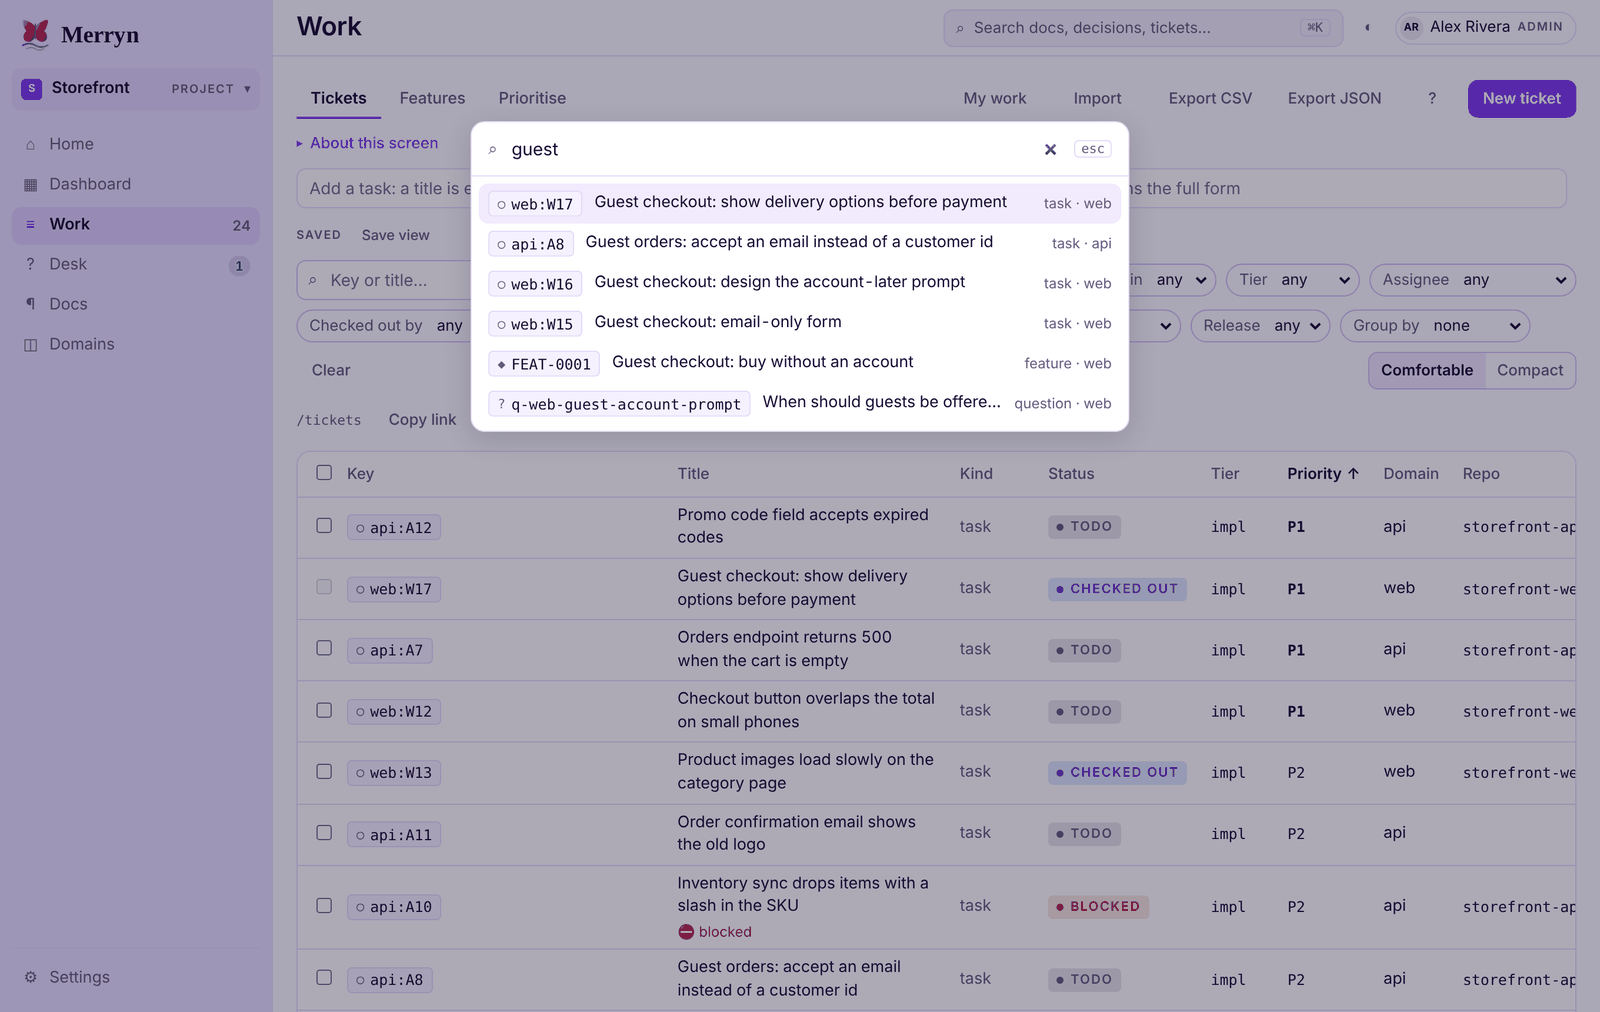
Press Ctrl+K (⌘K on a Mac) anywhere, or click the search bar. Type a word to find tickets, decisions, answered questions and domain charters. Use the arrow keys and Enter, or click, to open a result; Esc closes it.
Working from Claude
You never need an AI chat to use Merryn: everything in this guide works in the browser. If you do use Claude, there are two shortcuts.
Ask Claude to file it
Once your organization's Merryn connector is added to Claude, you can file a ticket in plain words, for example: "File a Merryn task in Storefront: the promo code field accepts expired codes, P1." Claude creates the ticket and tells you its key. If you have several projects connected, name the project.
Run the queue with the Merryn plugin
In Claude Code with the Merryn plugin installed, one command drives agents through the queue. The project name is optional when only one Merryn connection is set up.
| Command | What it does |
|---|---|
/merryn | The loop: answer what the Desk can, pull tickets, work each one, review, and repeat until the queue is empty. |
/merryn loop <project> | The same, for a named project. |
/merryn answer <project> | Work through the Desk from Claude. |
/merryn answer <project> --assist | The Desk boiled down to a few principle-level questions for you. |
/merryn status <project> | Where the project stands. Read only. |
/merryn run <project> <domain> | Work one area's tickets. Also groom, feature, pause and stop. |
Add --dry-run to see the plan without changing anything.
A daily routine and quick reference
Ten minutes a day keeps the agents moving.
- Home: read the cards. Anything under Needs you or Blocked comes first.
- Desk: answer what is under Needs you, then review Auto-answered.
- Dashboard: check for stuck checkouts and force-release any whose agent has gone quiet.
- Work: quick-add every issue you noticed since yesterday, then use Prioritise if the order needs changing.
Quick reference
| To do this | Go here |
|---|---|
| Log an issue fast | Work › type a title in quick add › Enter |
| Log an issue with detail | Work › New ticket › Create ticket |
| Add context to a ticket | Open the ticket › Comment |
| Change a ticket's priority | Open the ticket › Priority, or Work › Prioritise |
| Answer an agent's question | Desk › pick an option › write why › Decide |
| Park a decision for later | Desk › New question |
| Work a ticket yourself | Home › Check out next, or a ticket › Check out |
| Finish a ticket you hold | The ticket › Release… › Done |
| Unstick an abandoned checkout | Dashboard › Force release |
| Find anything | Ctrl+K (⌘K) |
| Connect an AI tool | Settings › Agents & connect |